Micro-Stack: Open-Source AI Infrastructure Suite
Three Open-Source Tools for Private AI Infrastructure Setup + One RAG Demo App
(* This documentation was created with the help of AI. If you have any feedback or suggestions, feel free to chat with our robot assistant in the bottom right corner of the page. *)
I. Introduction
Micro-Stack is an open-source suite of tools designed to simplify building private AI infrastructures from the ground up. It enables AI researchers, developers, and organizations to deploy scalable, no-code AI stacks without deep technical expertise. By automating infrastructure setup, Micro-Stack accelerates experimentation and reduces barriers to AI innovation.
Designed for AI practitioners, system administrators, and teams needing reliable, open-source infrastructure, Micro-Stack supports everything from small-scale testing to enterprise-grade deployments. Whether you're prototyping a new AI model or scaling production workloads, Micro-Stack provides the building blocks for efficient, cost-effective AI development.
Key benefits include reduced setup time, seamless integration between components, and support for modern technologies like containerization and distributed storage. Micro-Stack empowers users to focus on AI innovation rather than infrastructure complexities.
- Micro-Rack: A PXE boot environment for automated Linux OS installations on bare metal computers. It enables rapid deployment of high-performance computing resources, saving time on large-scale setups. Ideal for AI researchers needing compute clusters without manual configuration—supports diverse hardware and scales to thousands of devices.
- Micro-Tent: A hyper-converged infrastructure (HCI) deployment tool that automatically discovers and manages network resources. It builds resilient HCI clusters with storage, compute, and networking. Perfect for creating stable foundations for AI workloads—leverages open-source technologies like Ceph and Docker Swarm for flexibility and high availability.
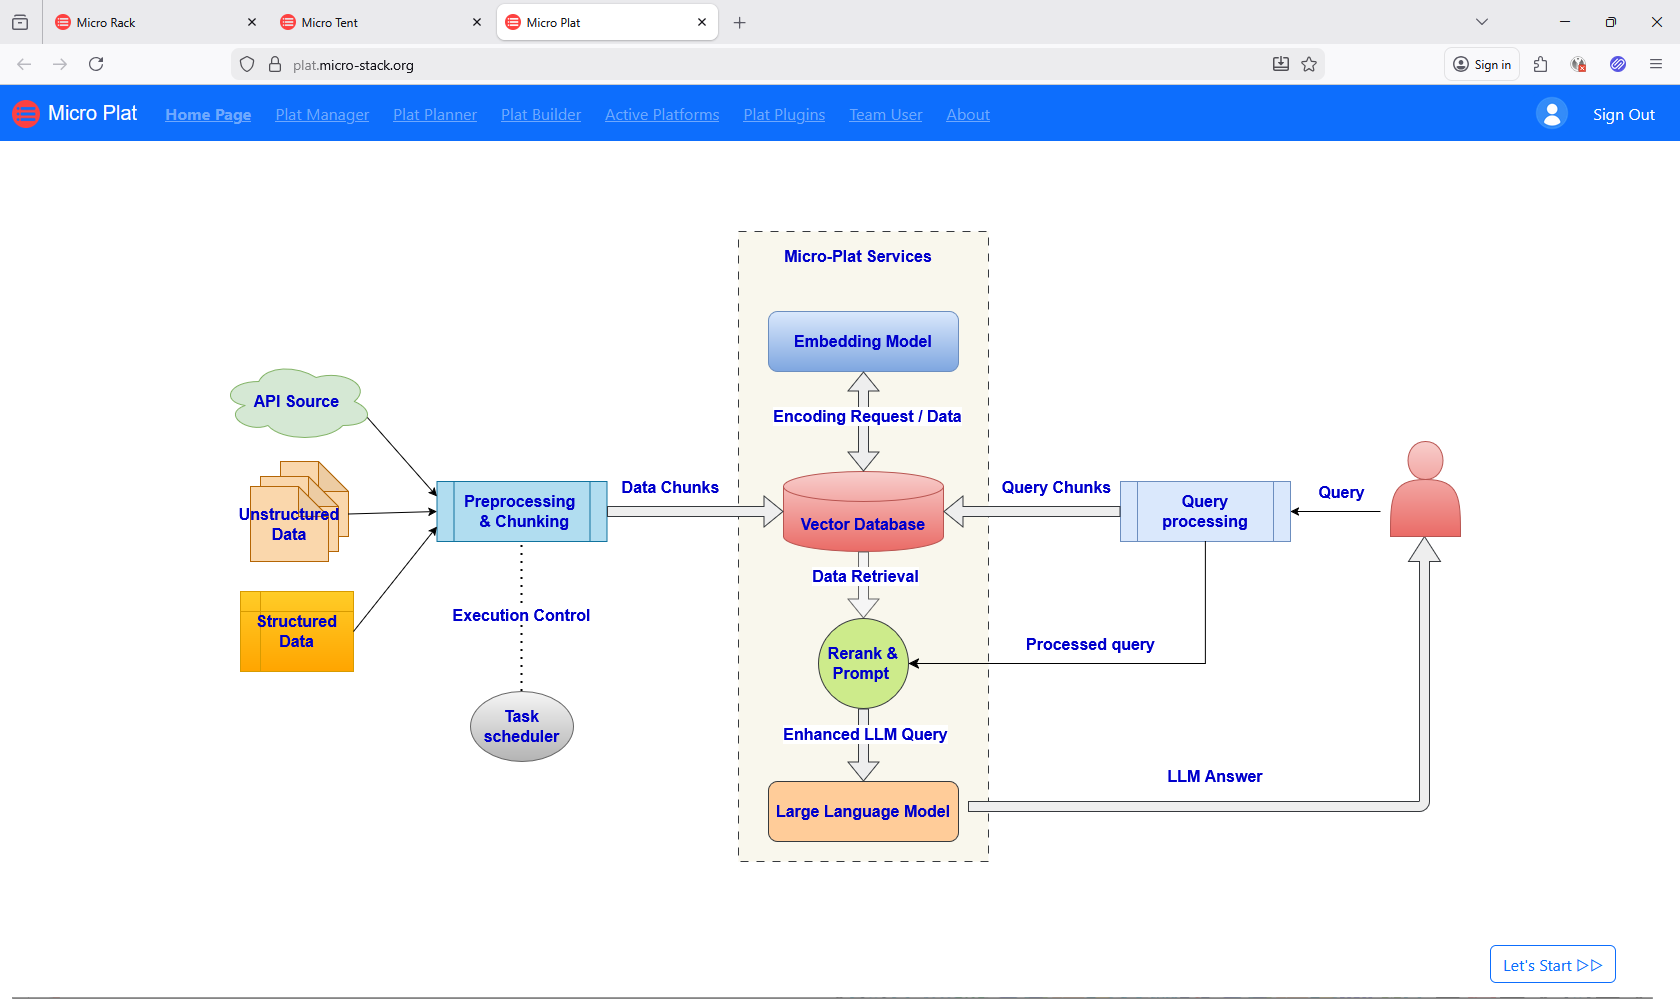
- Micro-Plat: A performance-focused RAG AI platform deployment environment. It identifies HCI clusters from Micro-Tent and sets up AI platforms for large user bases. Streamlines RAG (Retrieval-Augmented Generation) applications—automates scaling and management to handle demanding AI tasks efficiently.
- Micro-Play: A ready-to-use RAG AI chatbot boilerplate. It runs on Micro-Plat platforms, providing a demo interface for document upload and AI chat. Simplifies AI app development—includes pre-built components for quick experimentation and prototyping.
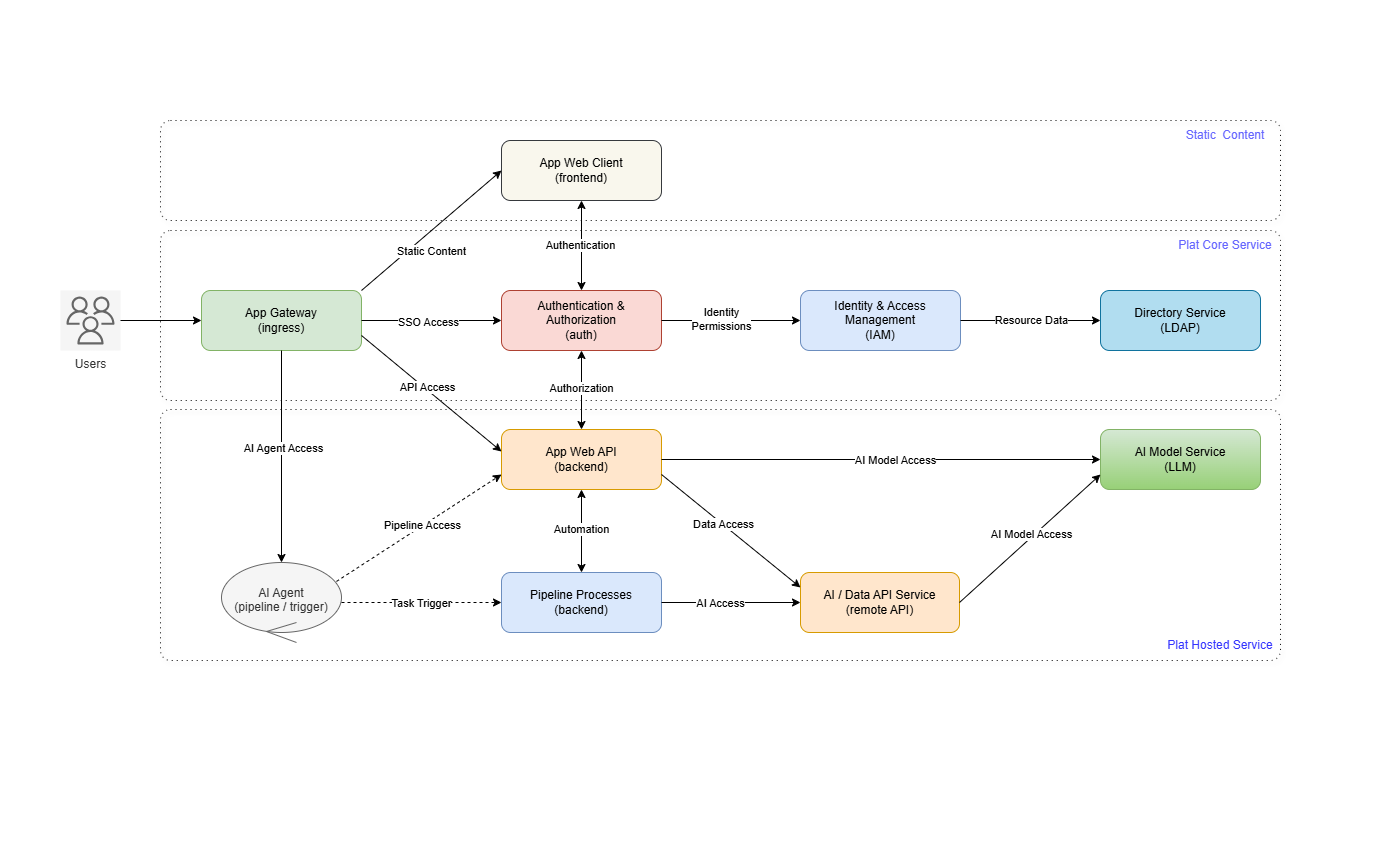
II. Architecture
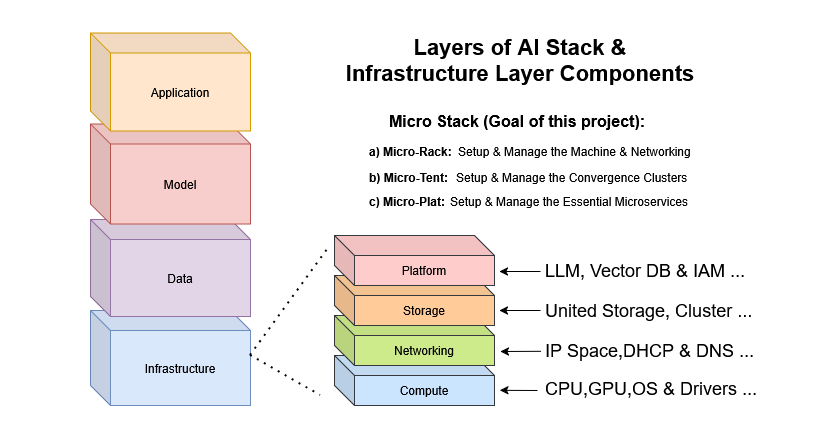
Micro-Stack follows a layered architecture that builds AI-ready infrastructure step-by-step. This modular design allows users to start small and scale up as needed, with each layer providing specific functionality while integrating seamlessly with others.
The stack operates in four main layers:
- Hardware Provisioning (Micro-Rack): Handles bare metal setup using PXE booting for automated OS installations across multiple devices.
- Cluster Formation (Micro-Tent): Discovers resources and creates hyper-converged infrastructure (HCI) clusters with storage, compute, and networking.
- AI Platform Deployment (Micro-Plat): Builds on HCI clusters to deploy scalable AI platforms optimized for RAG applications.
- Application Hosting (Micro-Play): Provides demo AI chatbots and tools that run on the deployed platforms.
This layered approach ensures reliability and scalability, allowing components to be updated independently while maintaining overall system integrity.
Key concepts include:
- PXE (Preboot Execution Environment): Enables network-based OS installations without local media.
- HCI (Hyper-Converged Infrastructure): Combines storage, compute, and networking in a single platform for simplified management.
- RAG (Retrieval-Augmented Generation): Enhances AI responses by retrieving relevant information from knowledge bases.
For deeper technical details, refer to the separate Technical Documentation.
III. Guides
This section provides step-by-step guides for using each Micro-Stack component. Start with Micro-Rack for hardware setup, then progress through Micro-Tent for clustering, Micro-Plat for AI deployment, and Micro-Play for applications. Each guide includes workflows, tips, and screenshots to help you get started quickly.
Micro-Rack
Micro-Rack provides a user-friendly interface for managing PXE server operations. Use the demo credentials (username: demo, password: demo) to explore. It supports booting from thousands of devices. The source code repository has more details.
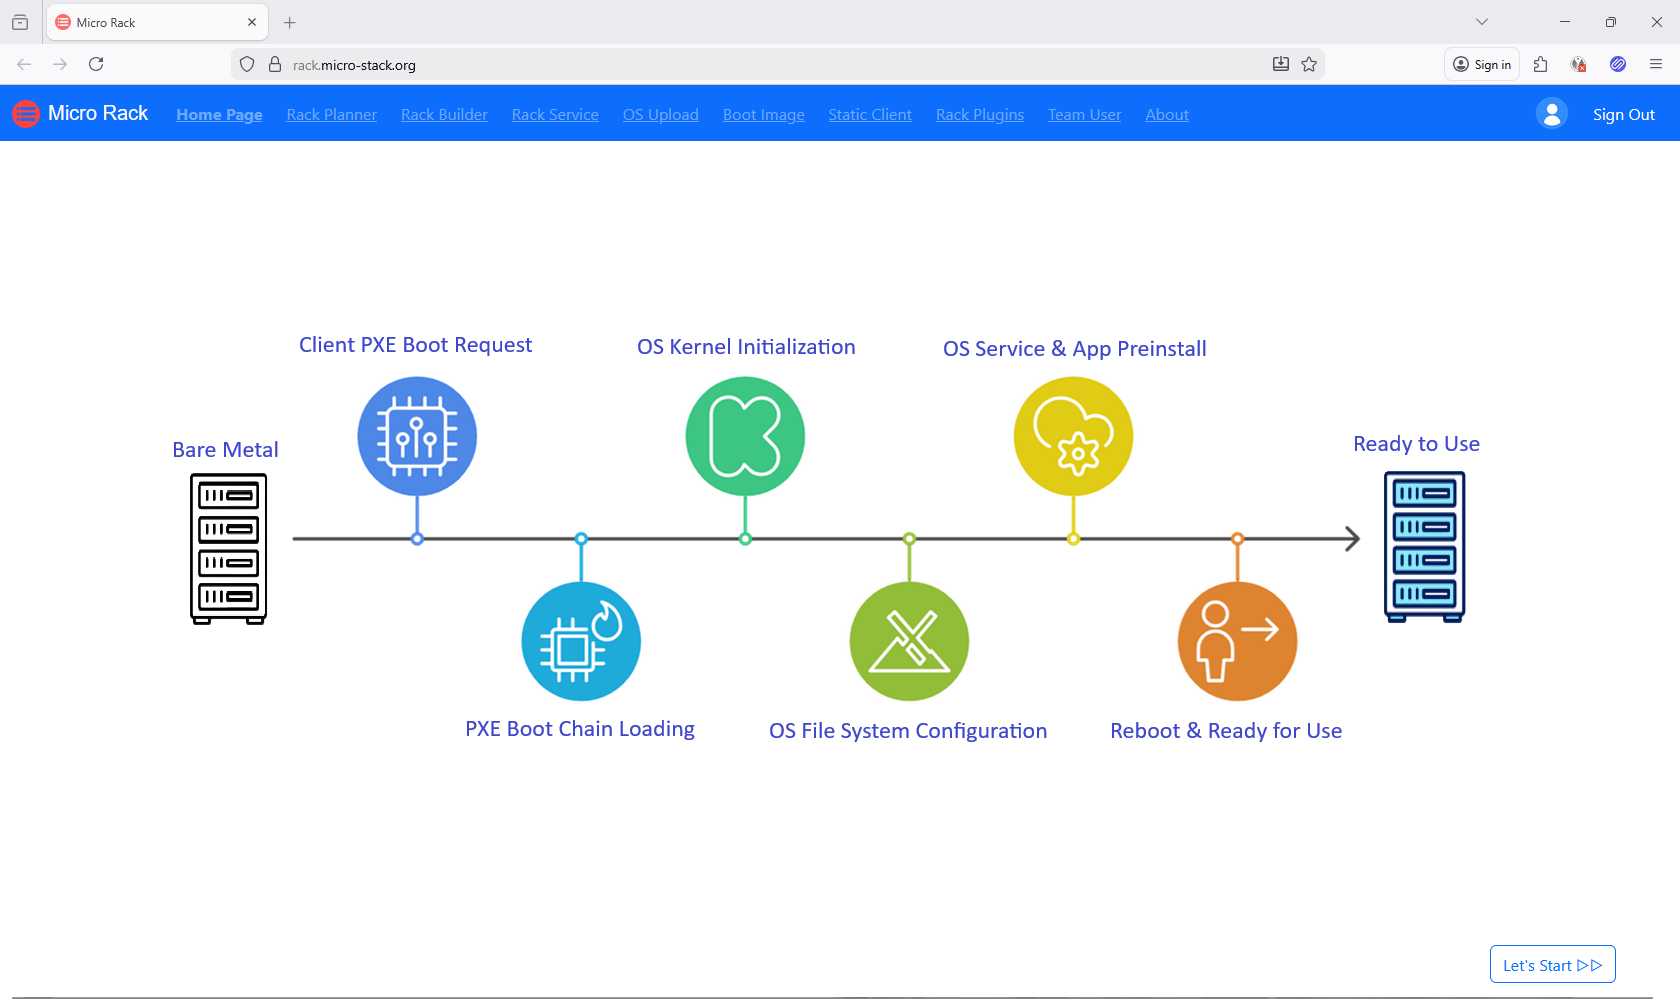
Workflow: Plan network settings → Upload OS images → Configure clients → Boot devices.
Steps:
- Plan Network Subnet
- Setup PXE Environment
- Check PXE Health
- Upload OS ISOs
- Manage OS Images
- Manage Static IPs
- Manage Plugins
- Manage Team
- Boot Clients
Tip: Ensure your network supports PXE booting. Start with demo mode to explore safely.
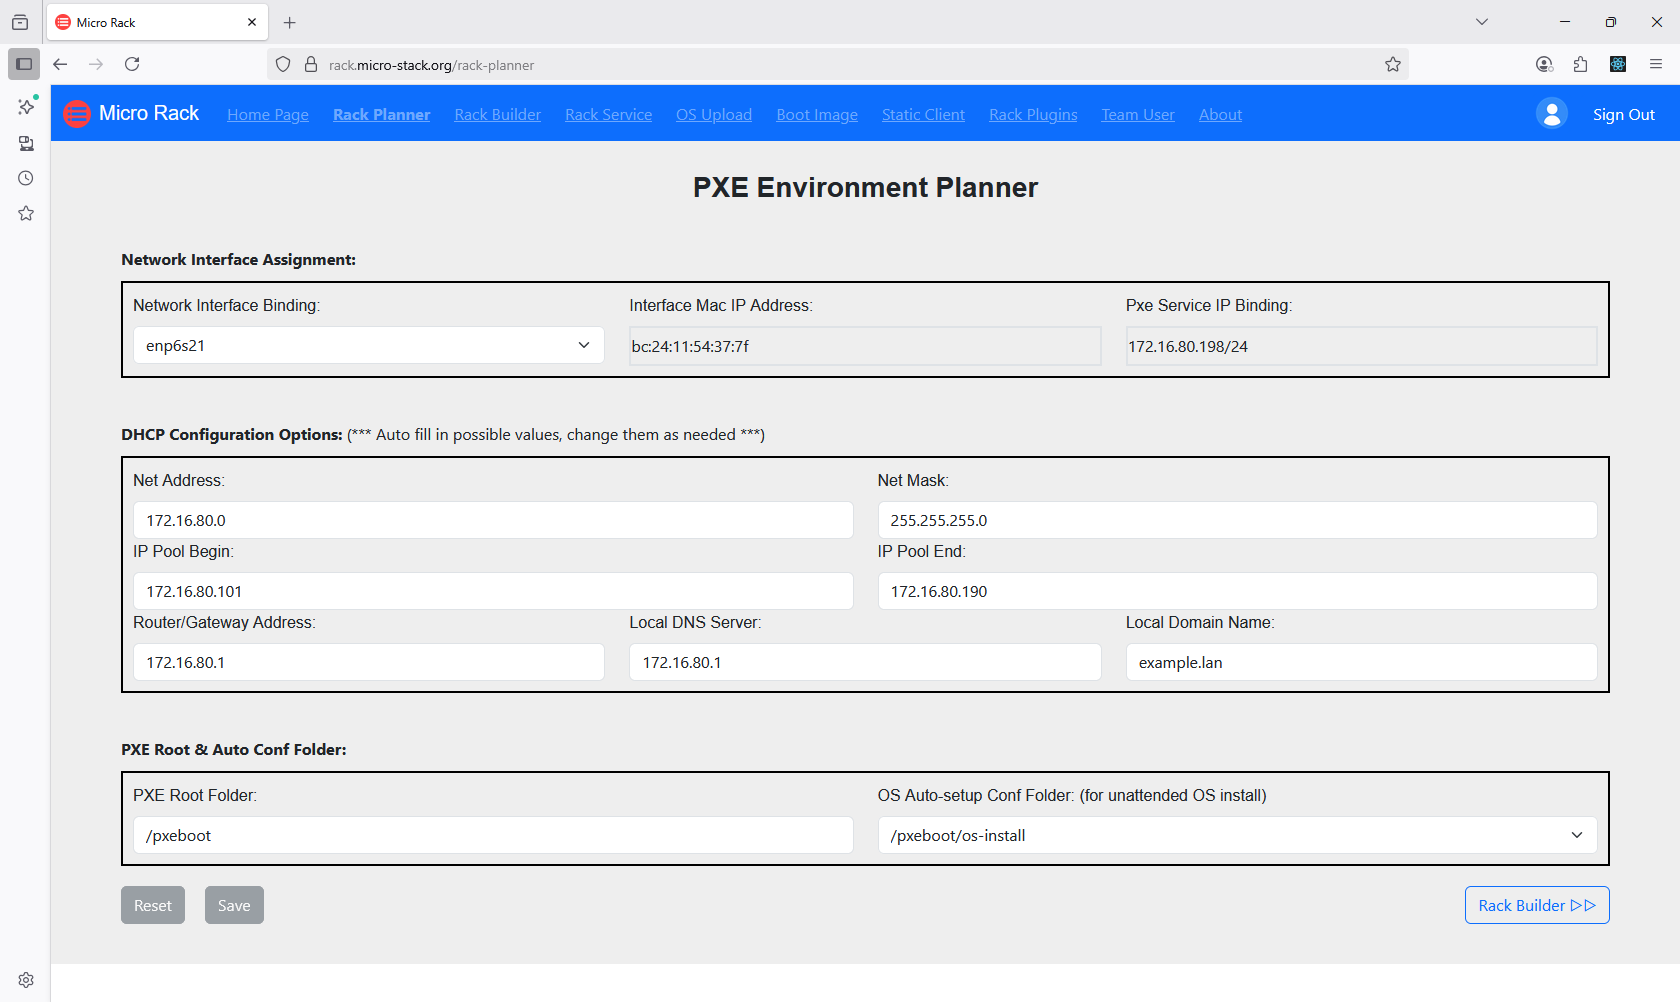
1. Plan Network Subnet
Begin by accessing the Planner interface from the home page. Here, you can configure network subnets to define the IP ranges for your PXE boot environment. Ensure that the subnets align with your network topology to avoid conflicts. This step is crucial for establishing the foundation of your automated OS installation setup. Once configured, proceed to the next steps for uploading images and booting devices.
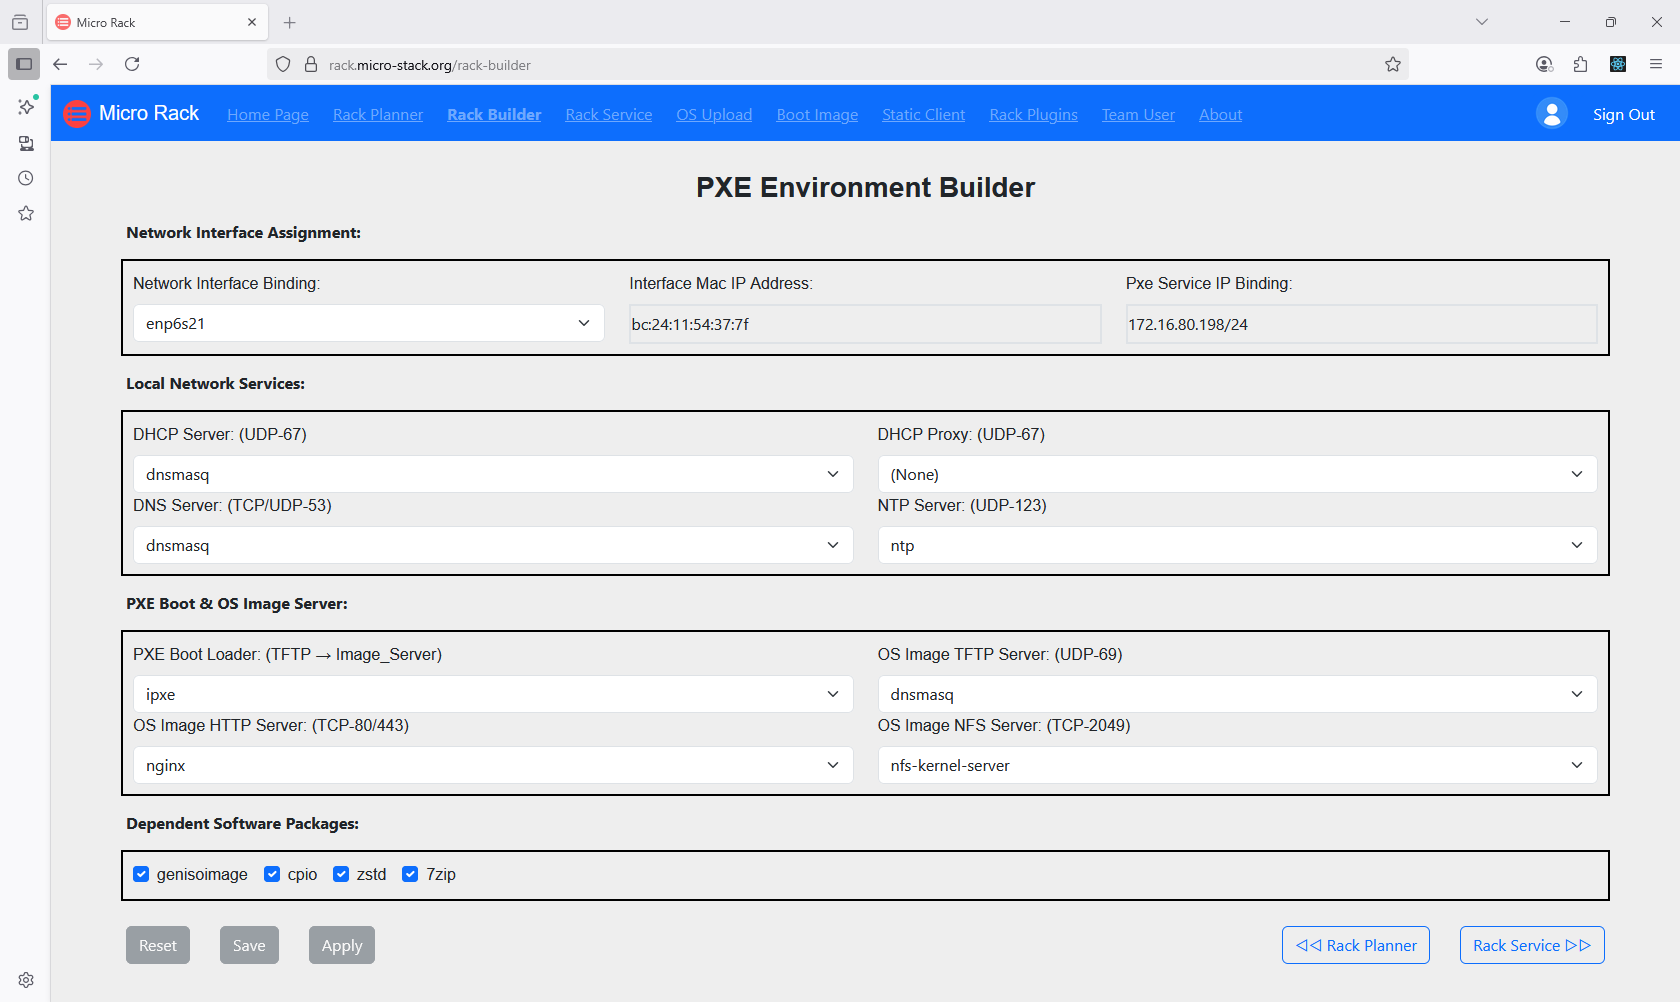
2. Setup PXE Environment
Next, utilize the Builder tool to apply the configurations set in the Planner. This involves setting up the PXE server with the necessary boot files and network settings. The Builder ensures that all components are properly integrated for seamless operation. You can monitor the setup process through the interface. Once completed, your PXE environment will be ready for OS installations.
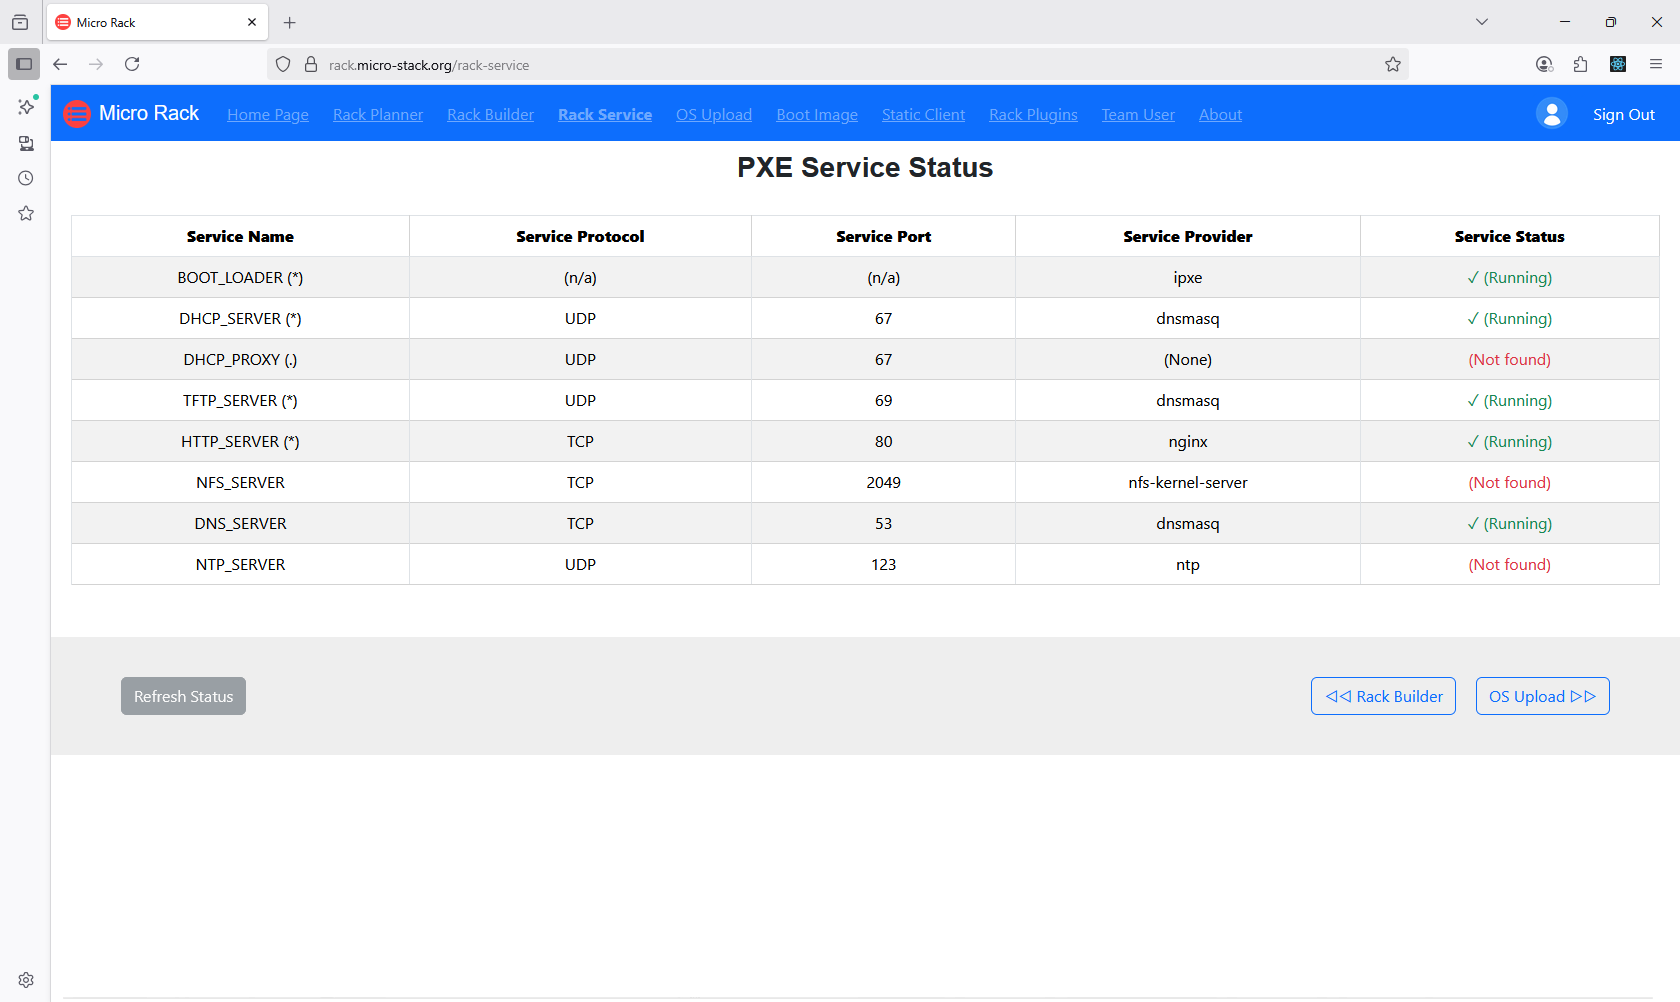
3. Check PXE Health
Access the Health section to monitor the overall system status and run diagnostics. This helps identify any issues with the PXE setup or network connectivity. Regular checks ensure optimal performance and reliability. Use the diagnostics tools to troubleshoot problems early. Maintaining system health is key to successful deployments.
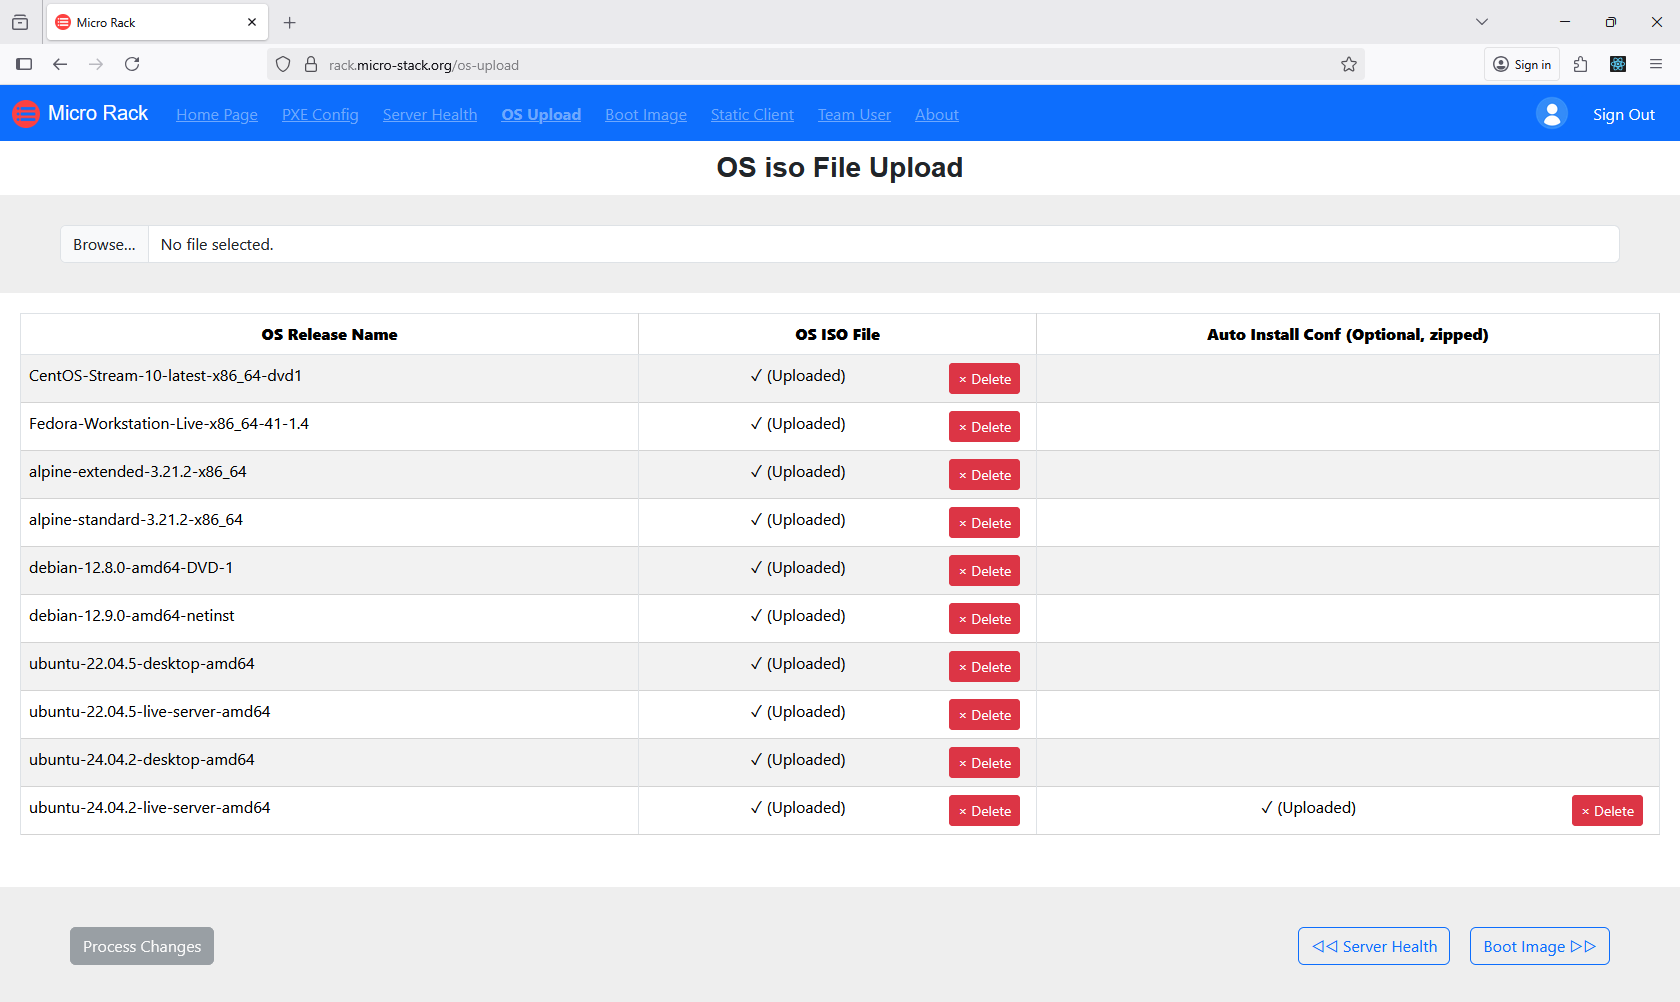
4. Upload OS ISOs
In this step, upload the ISO files for the operating systems you want to deploy. Ensure the ISOs are compatible with your hardware and PXE environment. The upload process may take time depending on file size and network speed. Once uploaded, the ISOs are stored and ready for use in installations. Proper ISO management is essential for efficient OS deployment.
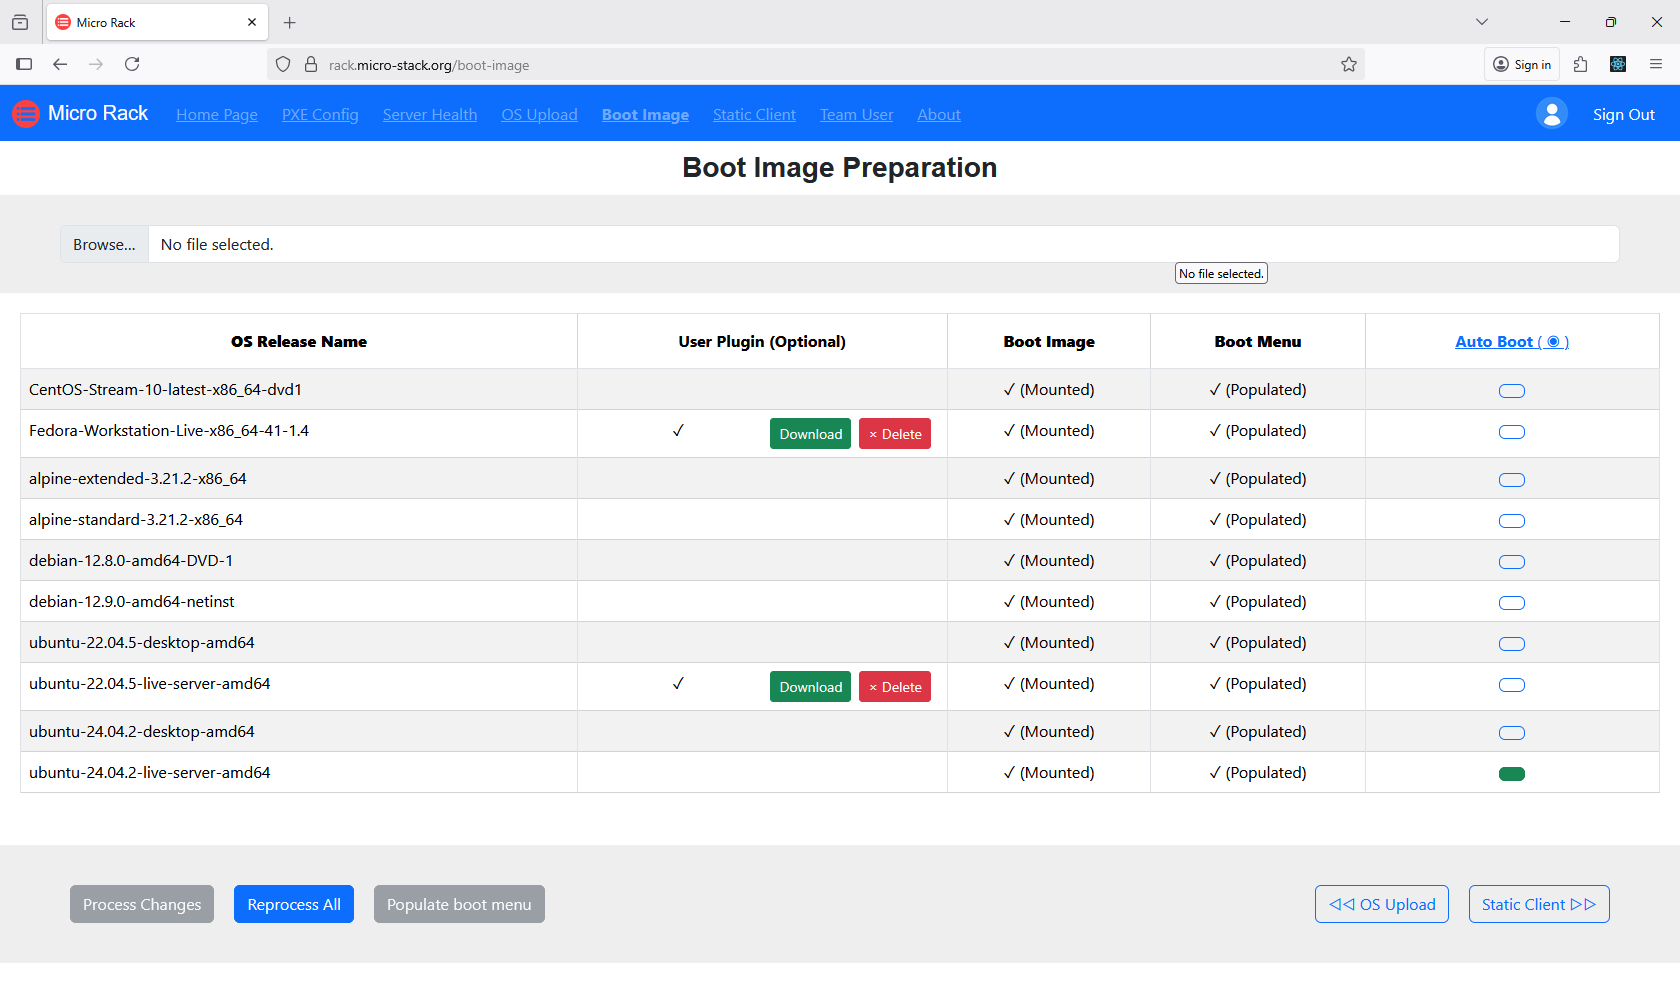
5. Manage OS Images
After uploading ISOs, manage the OS images through the dedicated interface. This includes organizing, updating, or removing images as needed. Image management allows you to maintain a library of available OS versions. Ensure images are optimized for your deployment scenarios. Effective image management streamlines the boot process.
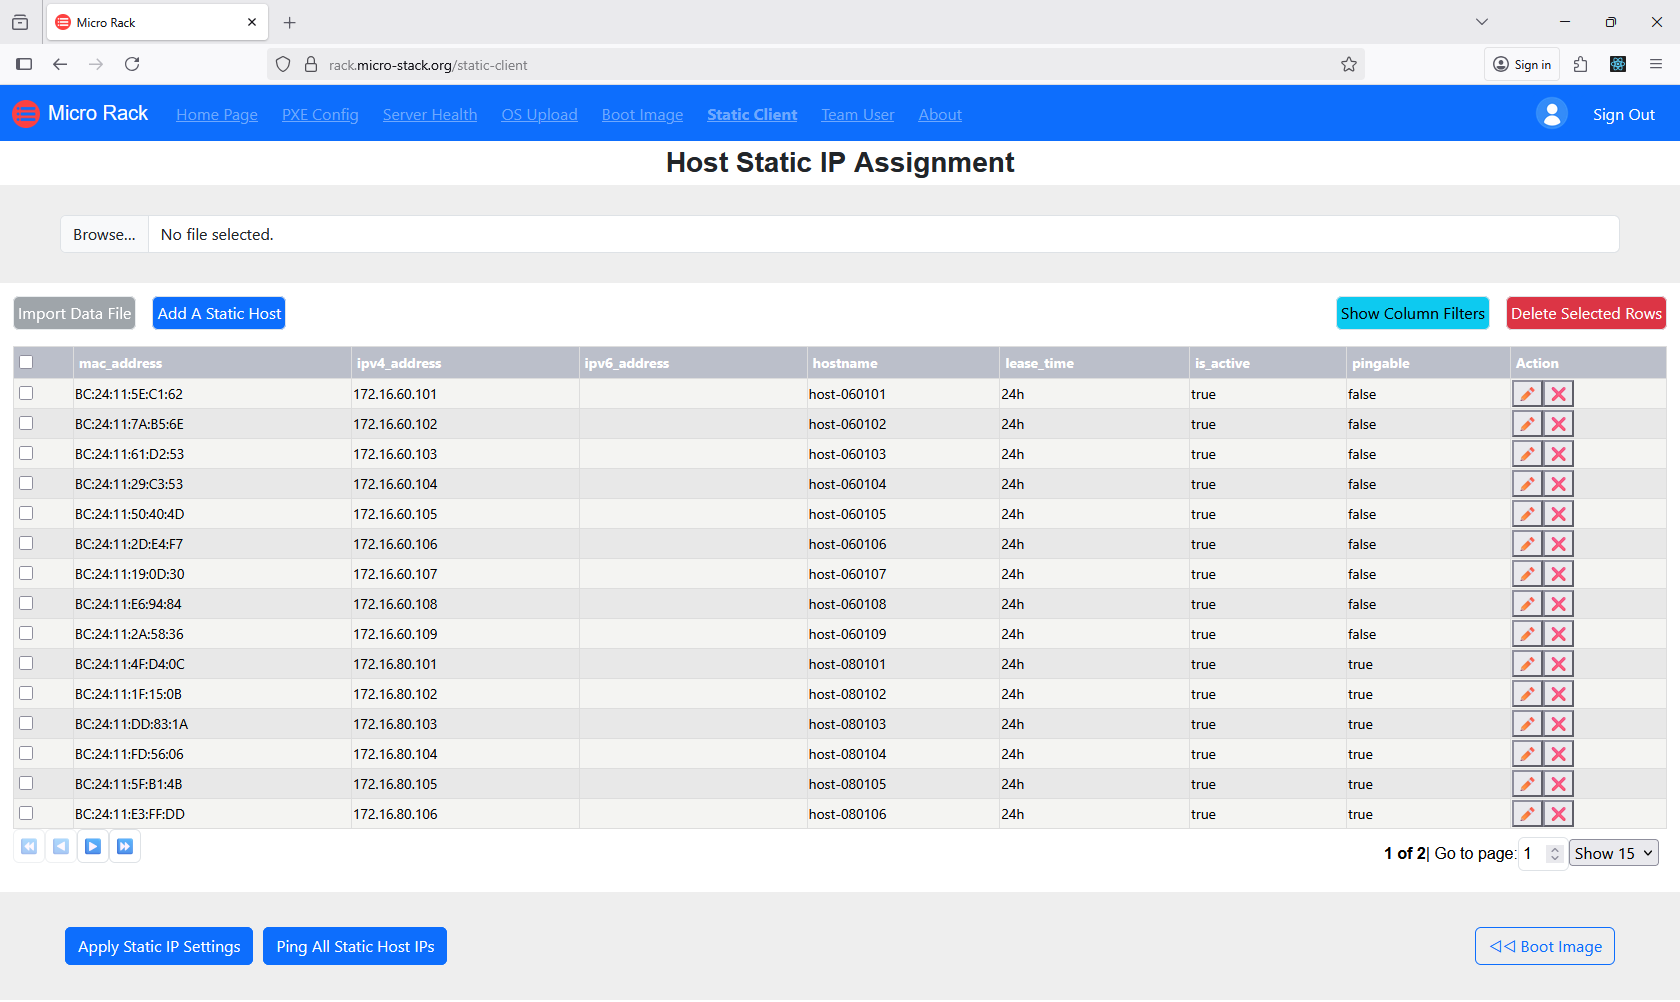
6. Manage Static IPs
Configure static IP addresses for client machines to ensure consistent network identification. This step involves assigning IPs within the defined subnets. Static IPs prevent conflicts and improve reliability in automated setups. Use the interface to input IP details for each client. Proper IP configuration is crucial for PXE booting.
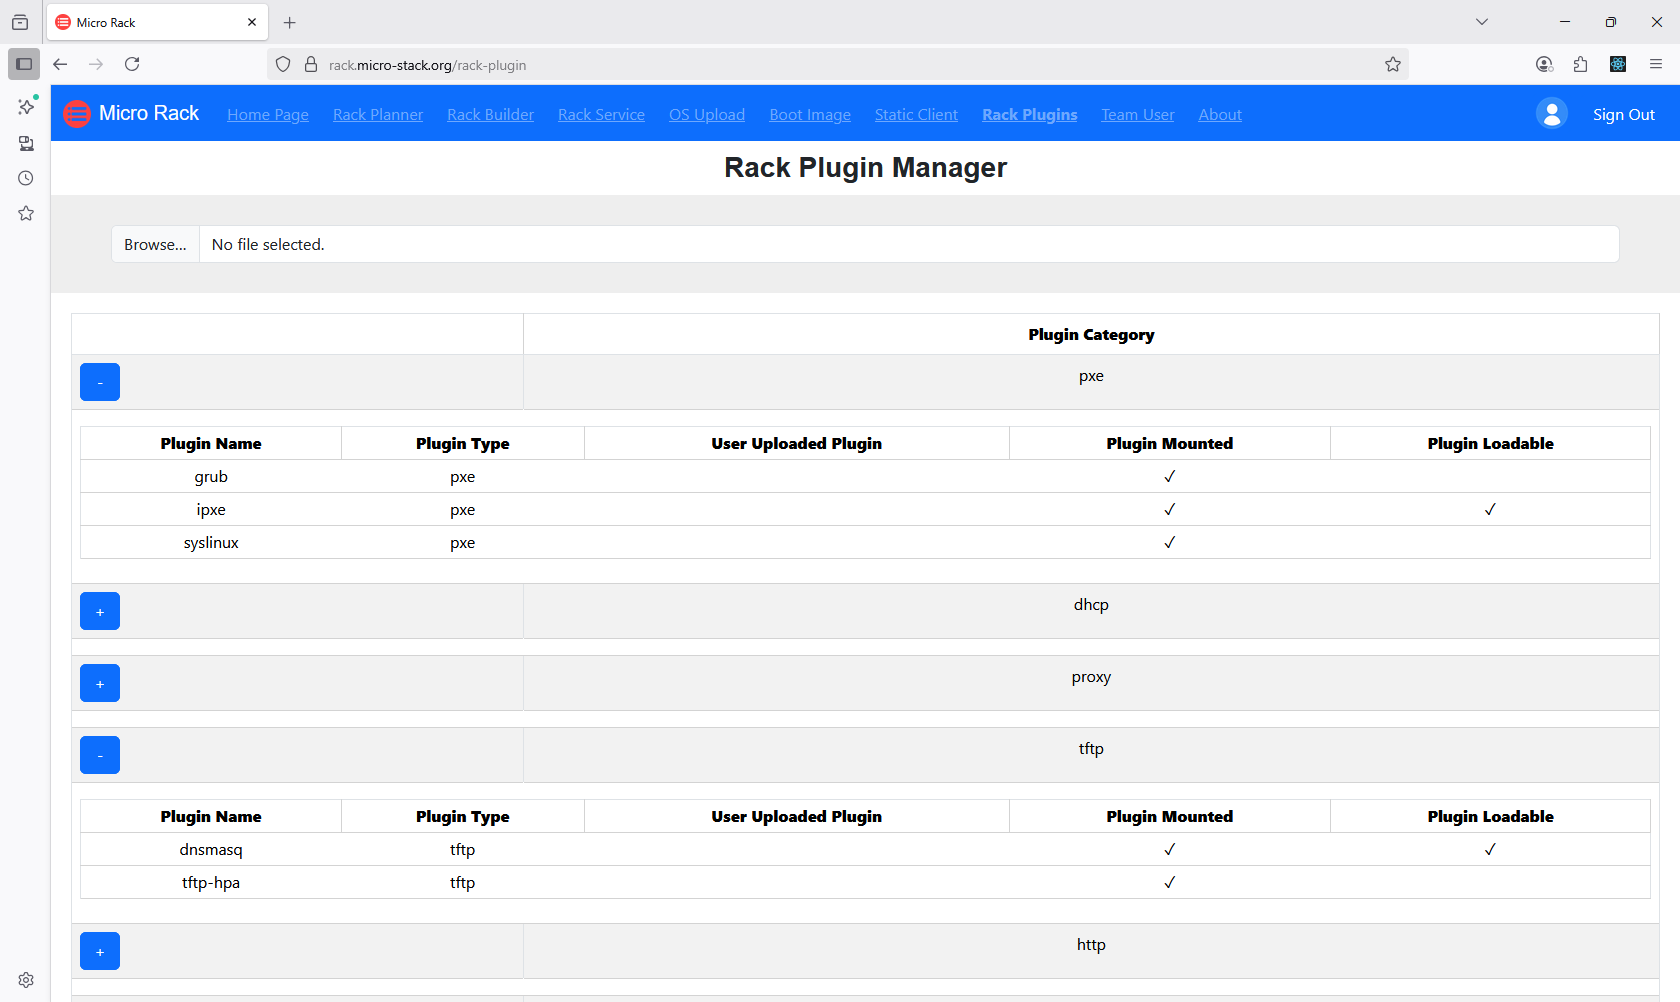
7. Manage Plugins
Enhance your setup with plugins for additional customization options. Plugins can add features like custom scripts or integrations. Manage plugins through the interface to install, update, or remove them. Choose plugins that align with your deployment needs. Plugin management allows for tailored PXE environments.
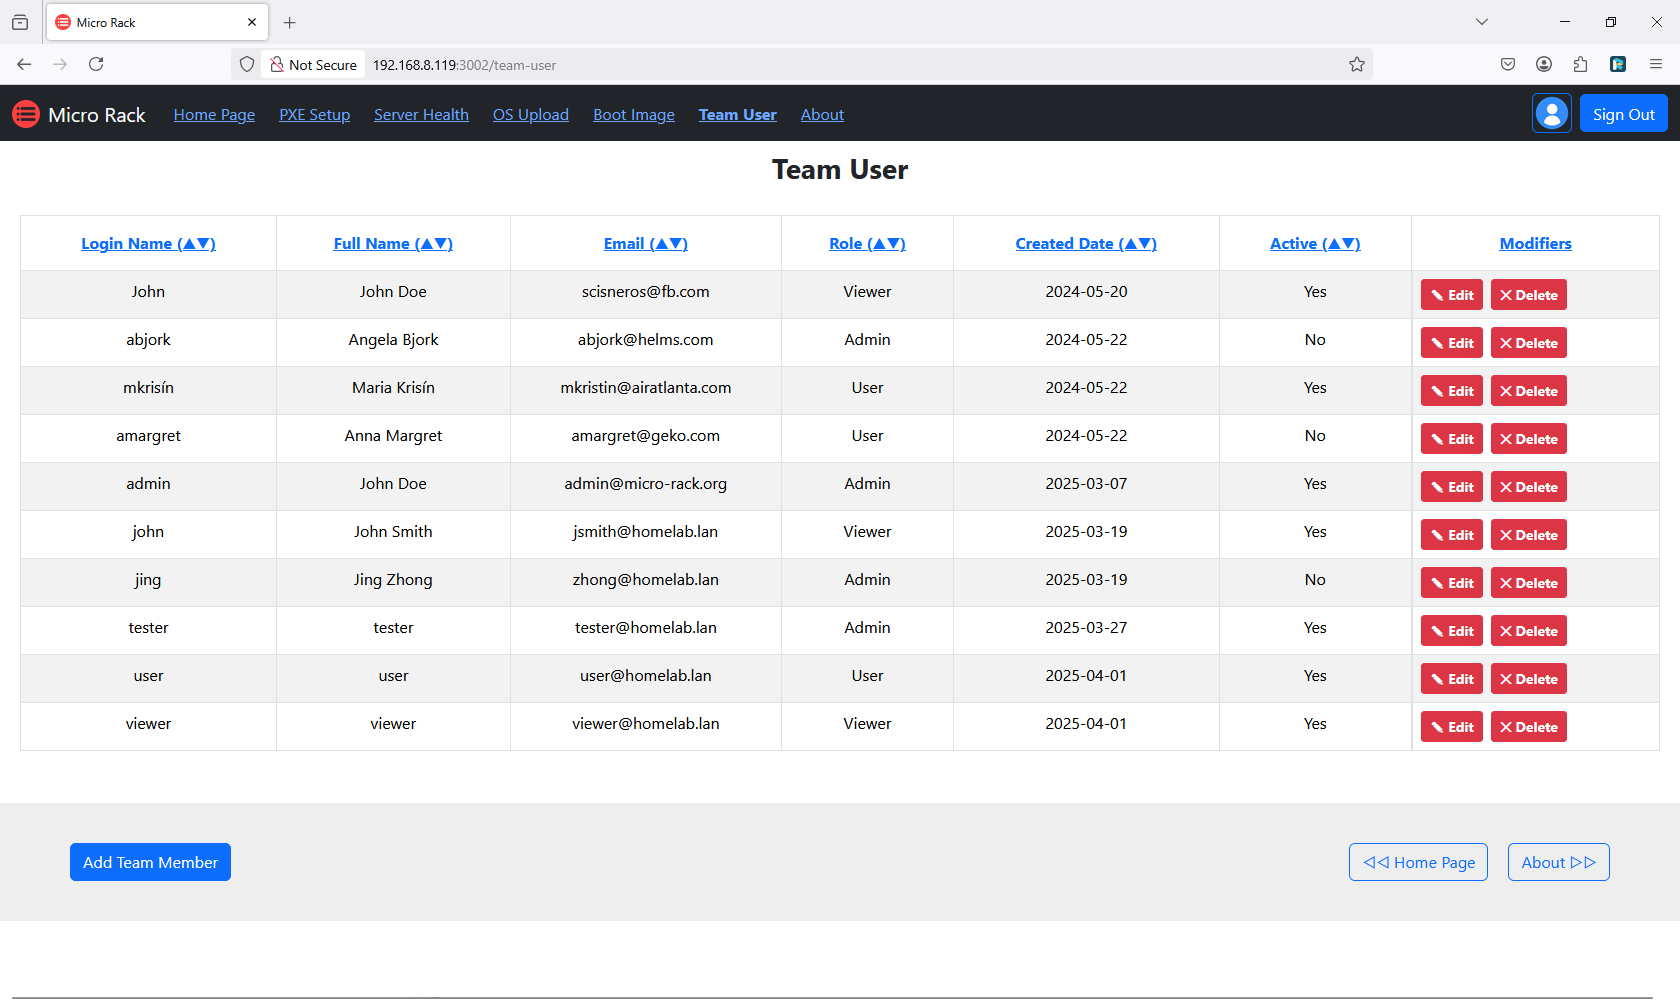
8. Manage Team
Set up team users and profiles for collaborative access to the system. This involves creating accounts with appropriate permissions. User management ensures secure and controlled access. Assign roles based on responsibilities. Proper team management facilitates efficient teamwork.
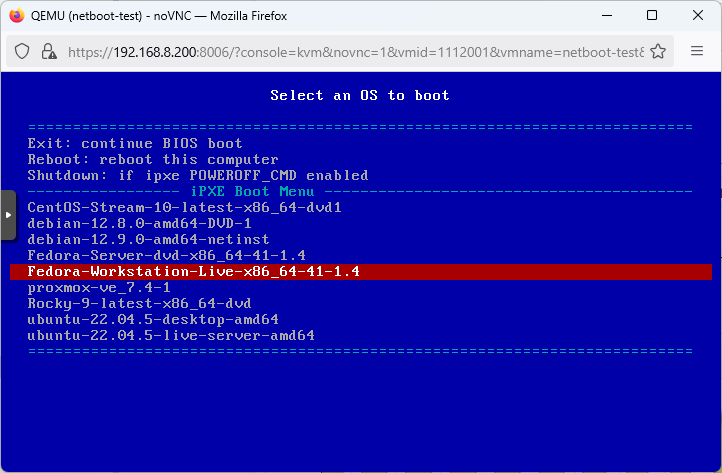
9. Boot Clients
Finally, initiate PXE booting on client computers. Ensure clients are configured to boot from the network. Monitor the boot process for successful OS installation. This step completes the automated deployment. Troubleshoot any issues that arise during booting.
Micro-Tent
Micro-Tent automates HCI setup across your network. Access the live demo with demo/demo. It discovers resources and builds clusters. See the GitHub repo for more.
Workflow: Discover resources → Plan clusters → Build HCI → Manage clusters.
Steps:
Tip: Ensure devices are on the same network. Clusters from Micro-Tent can be used in Micro-Plat.
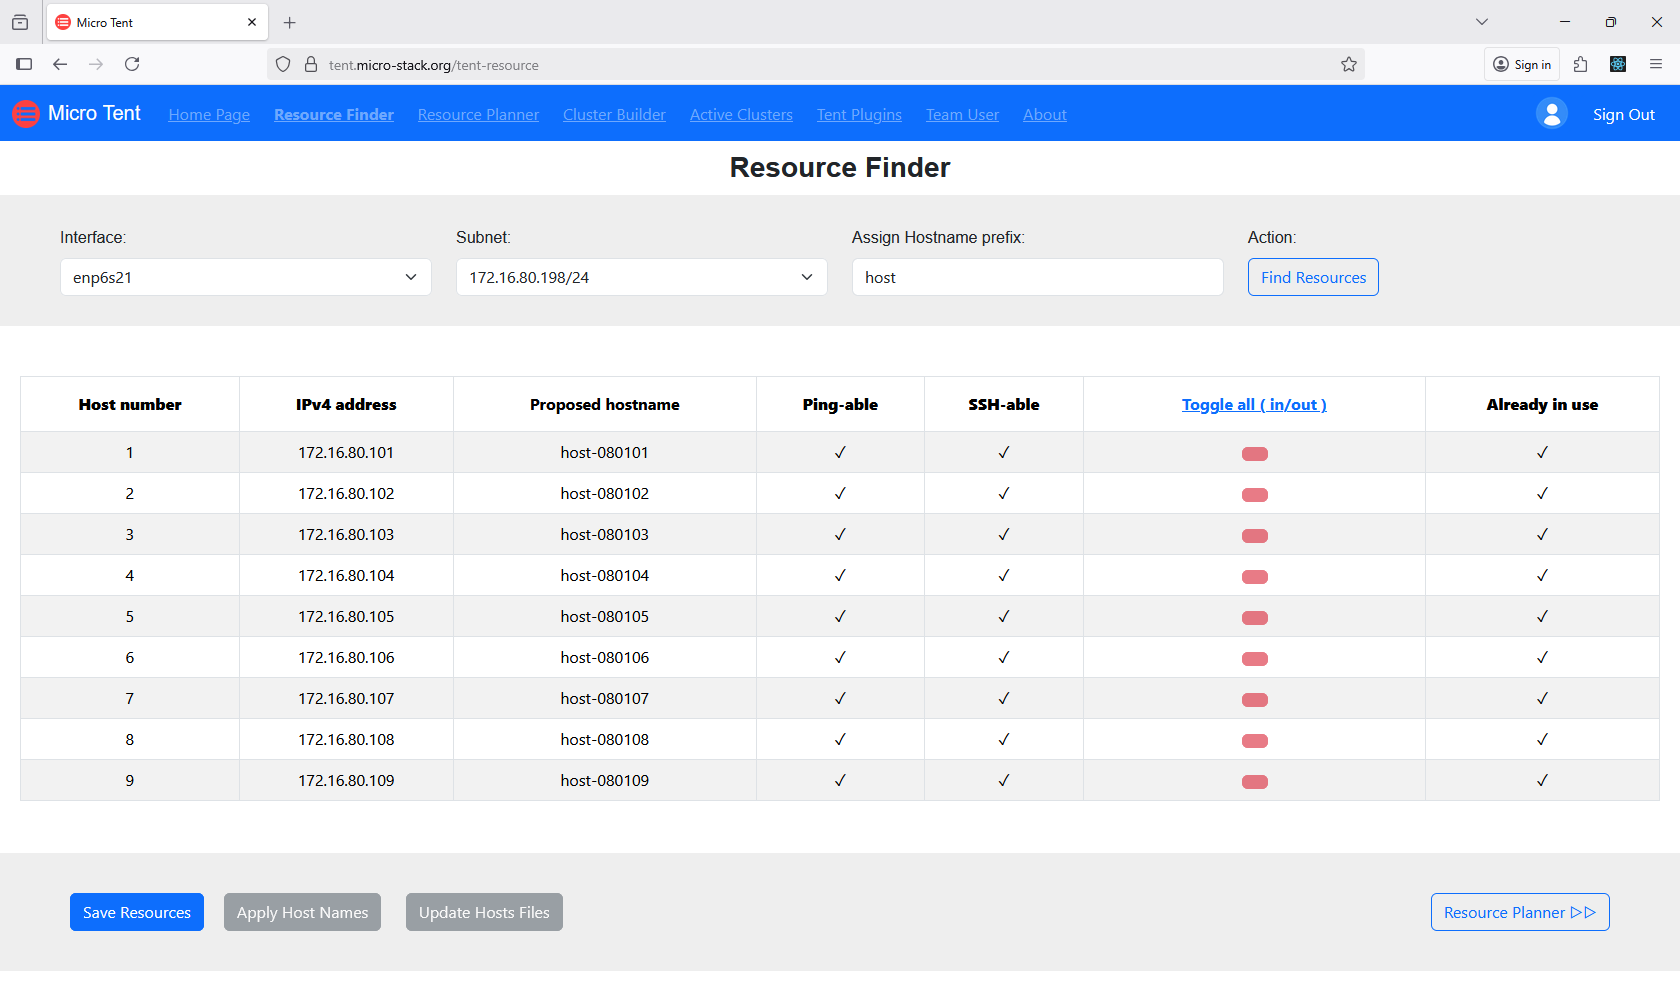
1. Discover Resources
Utilize the Resource Finder tool to scan your network for available devices. This automated discovery helps identify potential resources for clustering. Ensure your network is properly configured for scanning. The tool provides a list of discovered devices. Use this information to plan your cluster formation.
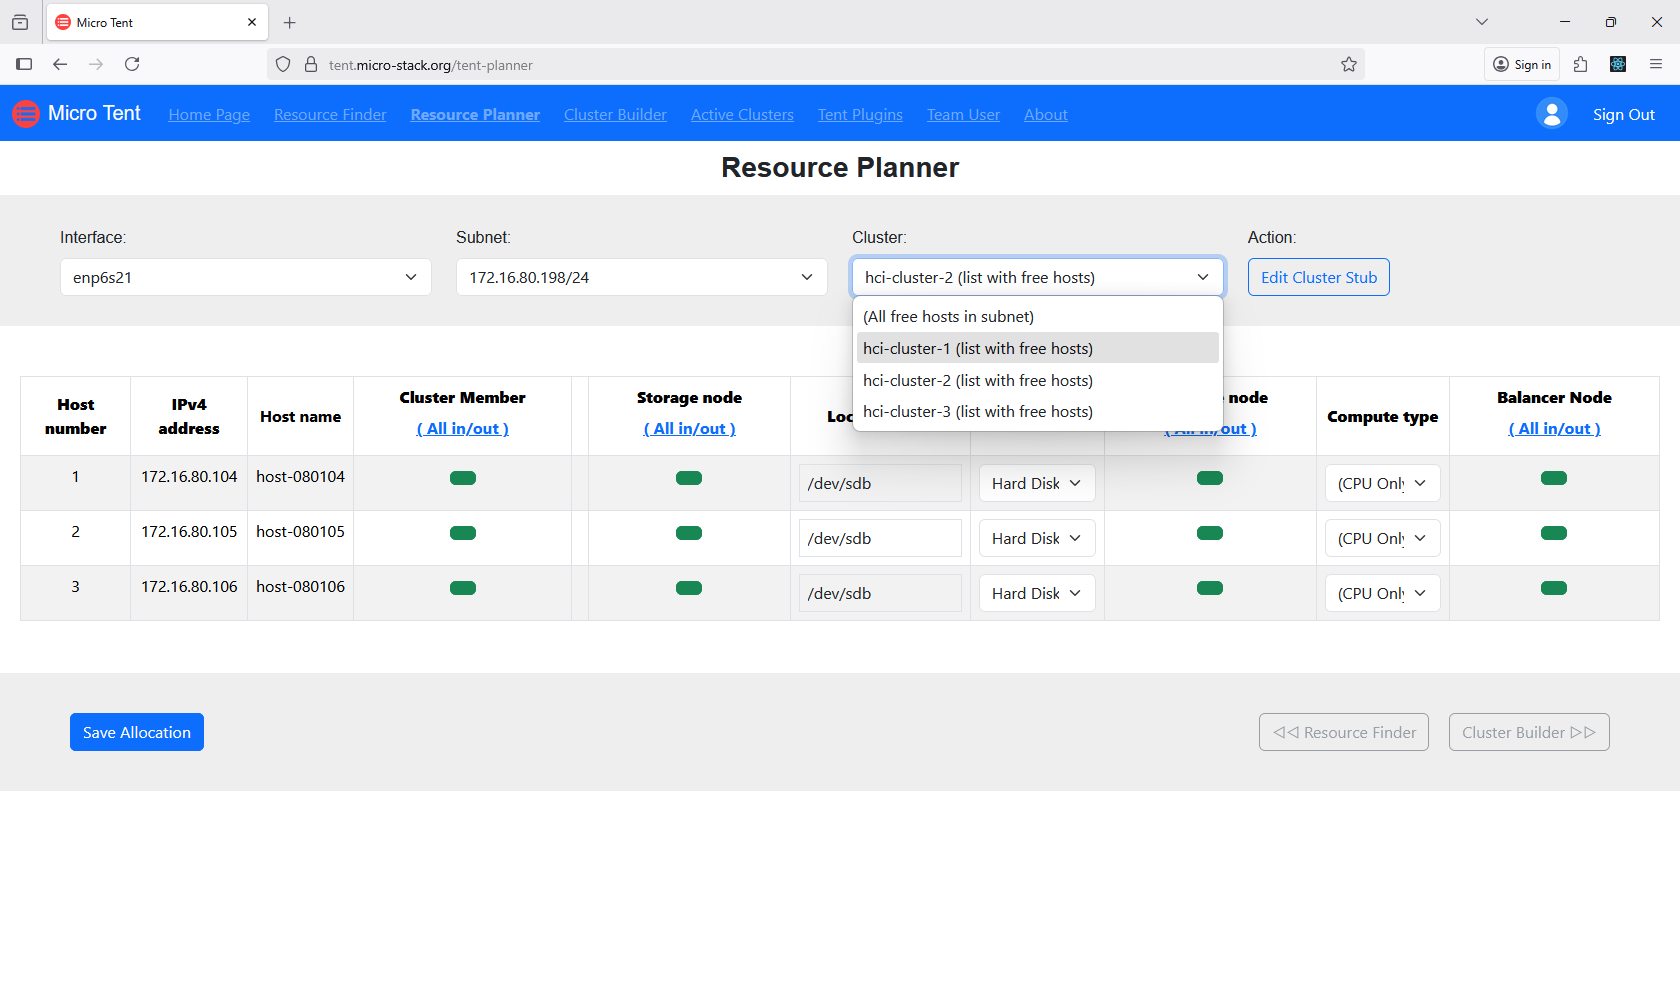
2. Plan Resources
Access the Resource Planner to allocate discovered resources for your clusters. This involves selecting devices and assigning roles. Proper allocation ensures balanced and efficient clusters. Review the planner's recommendations. Confirm your selections before proceeding.
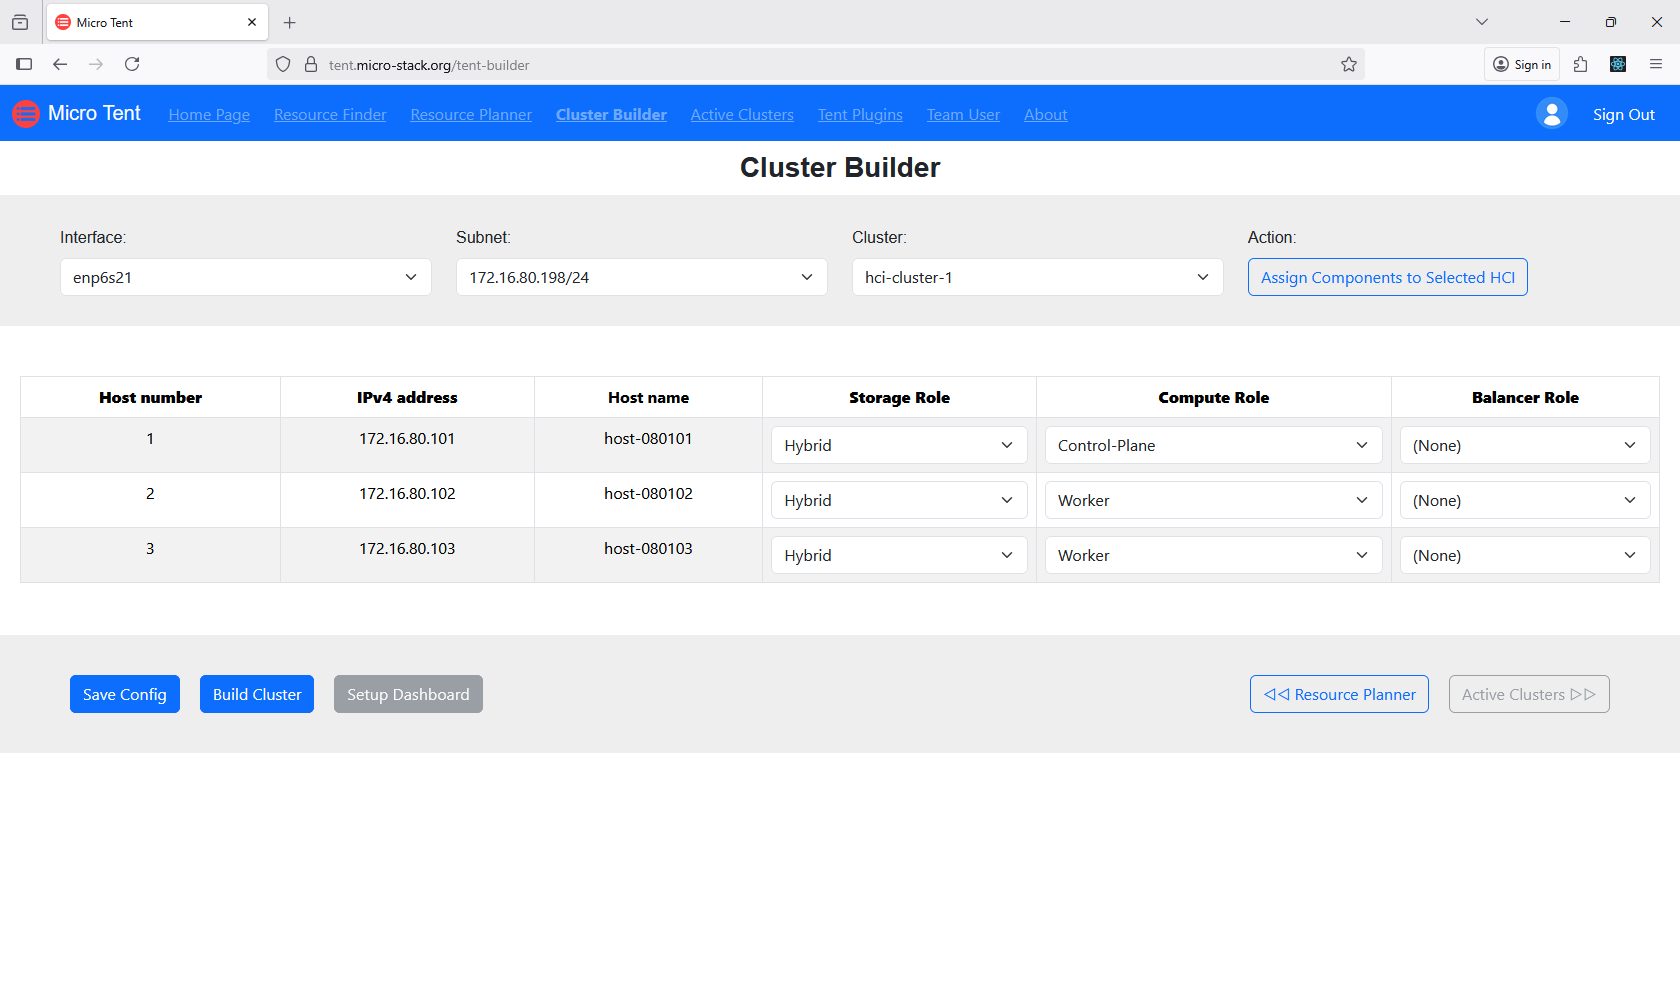
3. Build Clusters
Use the Cluster Builder tool to create hyper-converged clusters from allocated resources. This step integrates storage, compute, and networking. Monitor the building process for any issues. The tool automates much of the configuration. Successful building results in operational clusters.
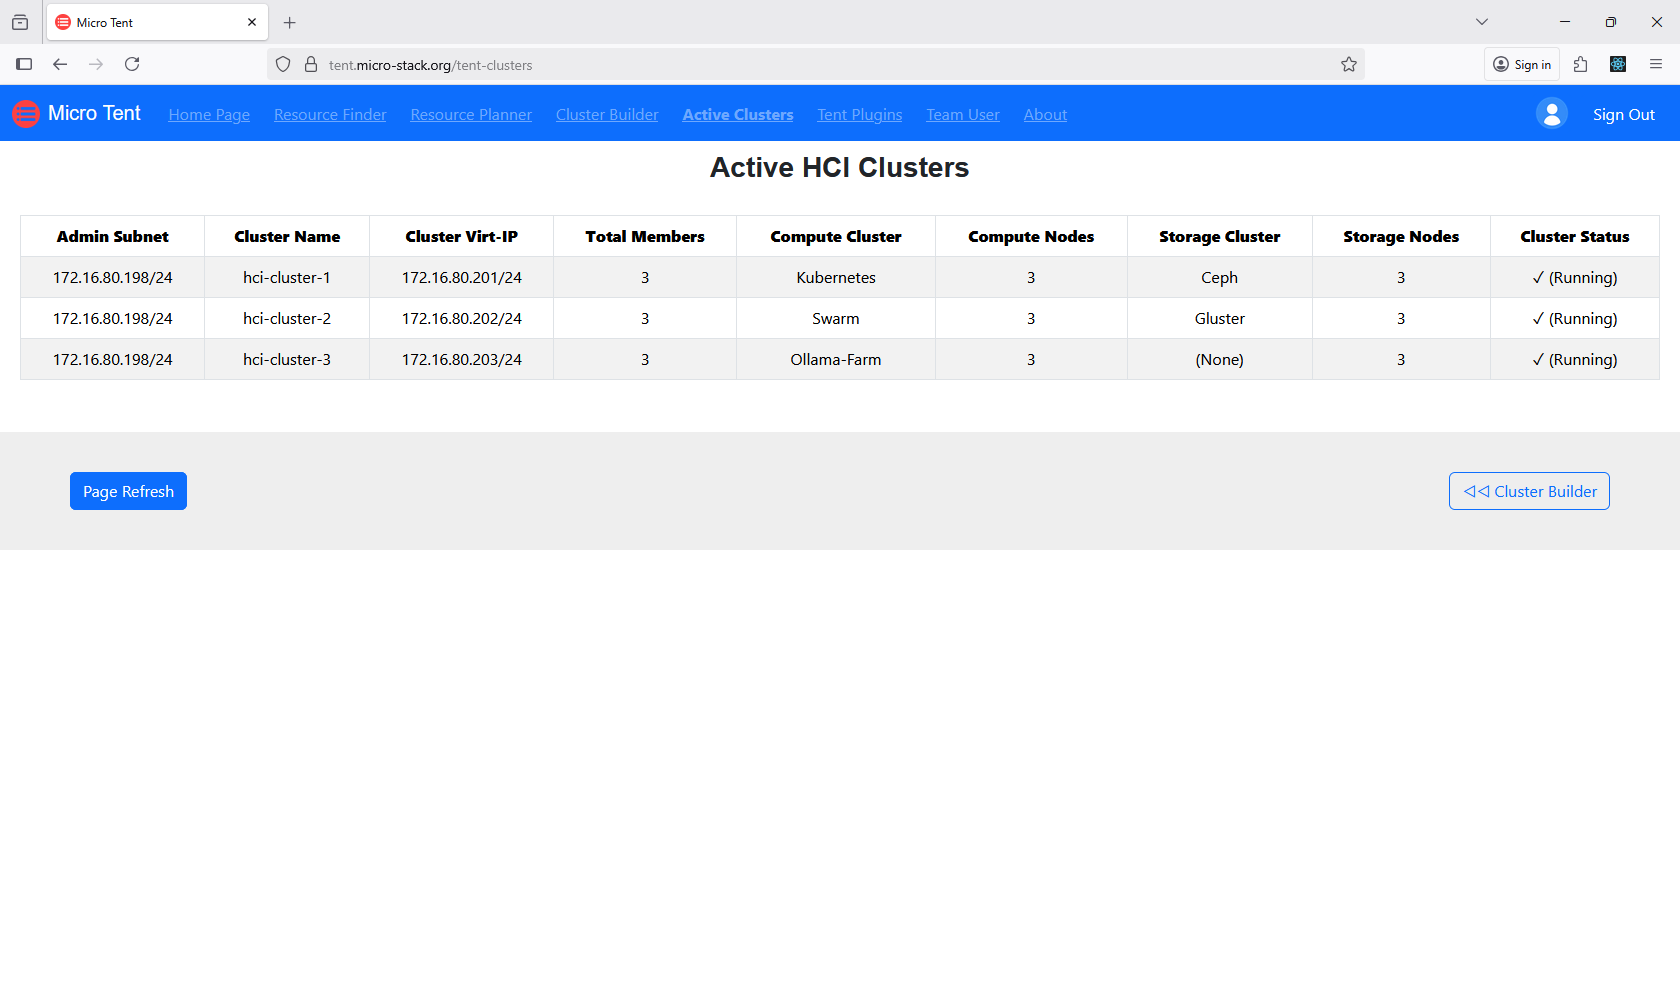
4. Check Clusters
Monitor your active clusters through the dedicated interface. Check status indicators and performance metrics. This helps maintain optimal operation. Address any alerts or issues promptly. Regular monitoring ensures reliability.
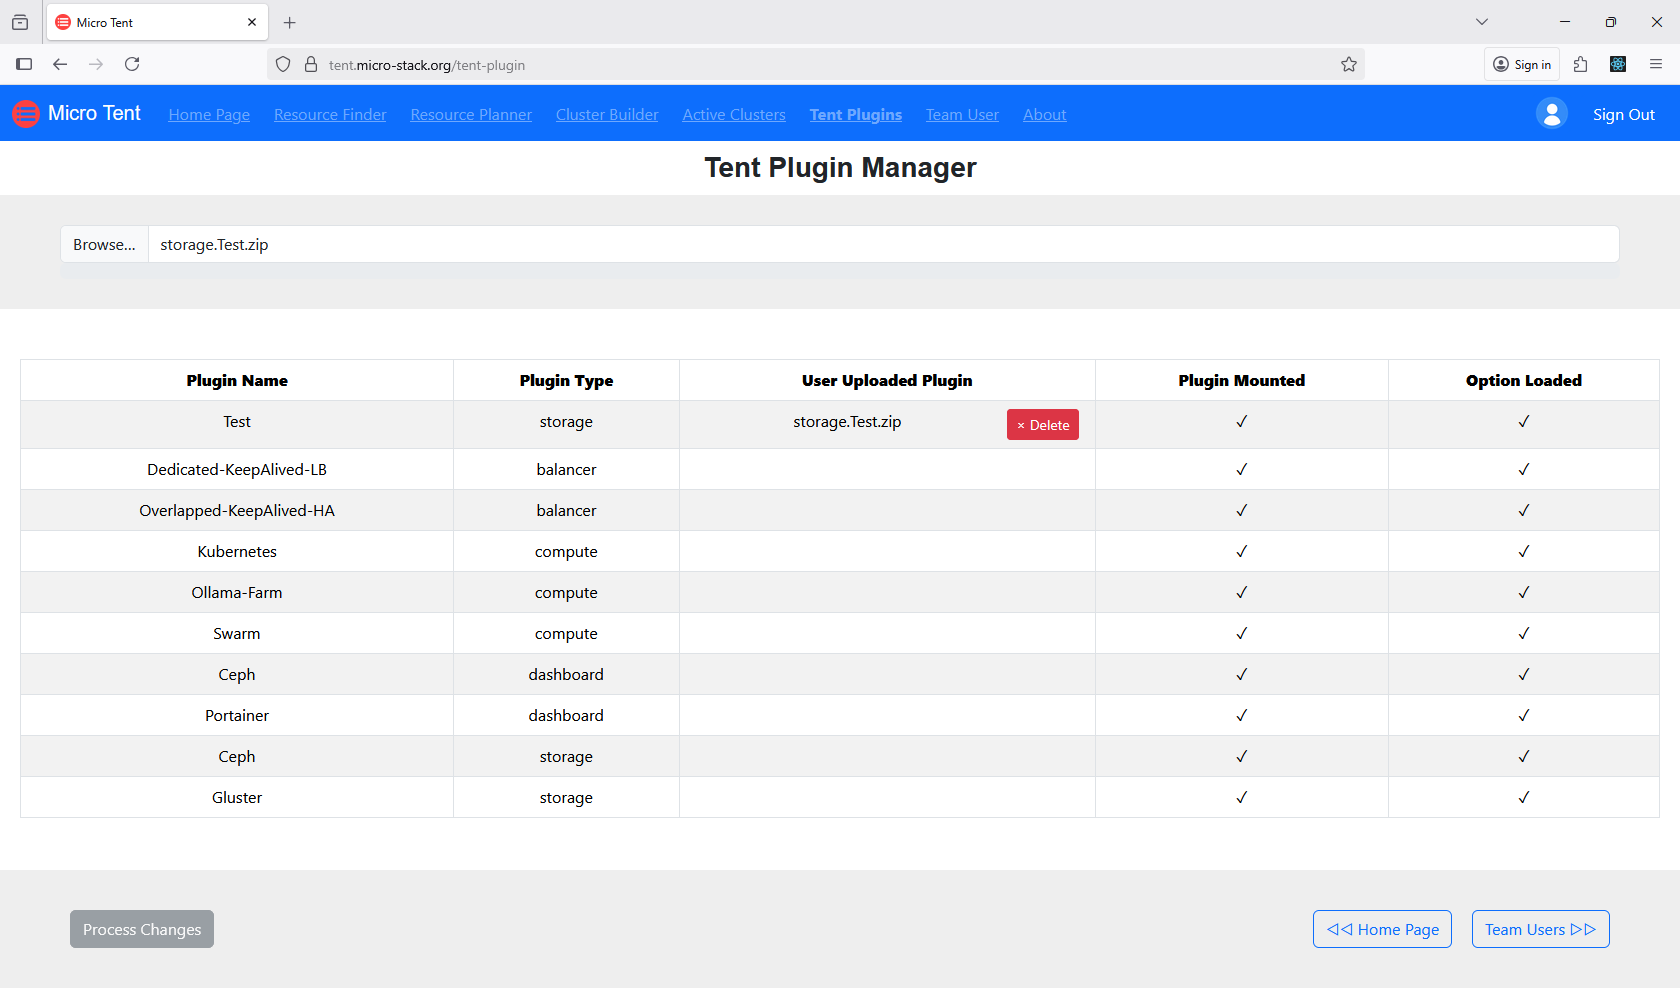
5. Manage Plugins
Manage plugins to customize your cluster environment. Plugins can add features or integrations. Install or remove plugins as needed. Ensure compatibility with your setup. Plugin management enhances functionality.
6. Manage Team
(Please refer to the Micro-Rack Manage Team step.)
Micro-Plat
Micro-Plat deploys RAG AI platforms on HCI clusters. Try the demo with demo/demo. It auto-discovers clusters from Micro-Tent. Check the repo.
Workflow: Discover clusters → Plan platforms → Build AI setups → Manage platforms.
Steps:
Tip: Platforms support large user bases. Use for deploying RAG applications efficiently.
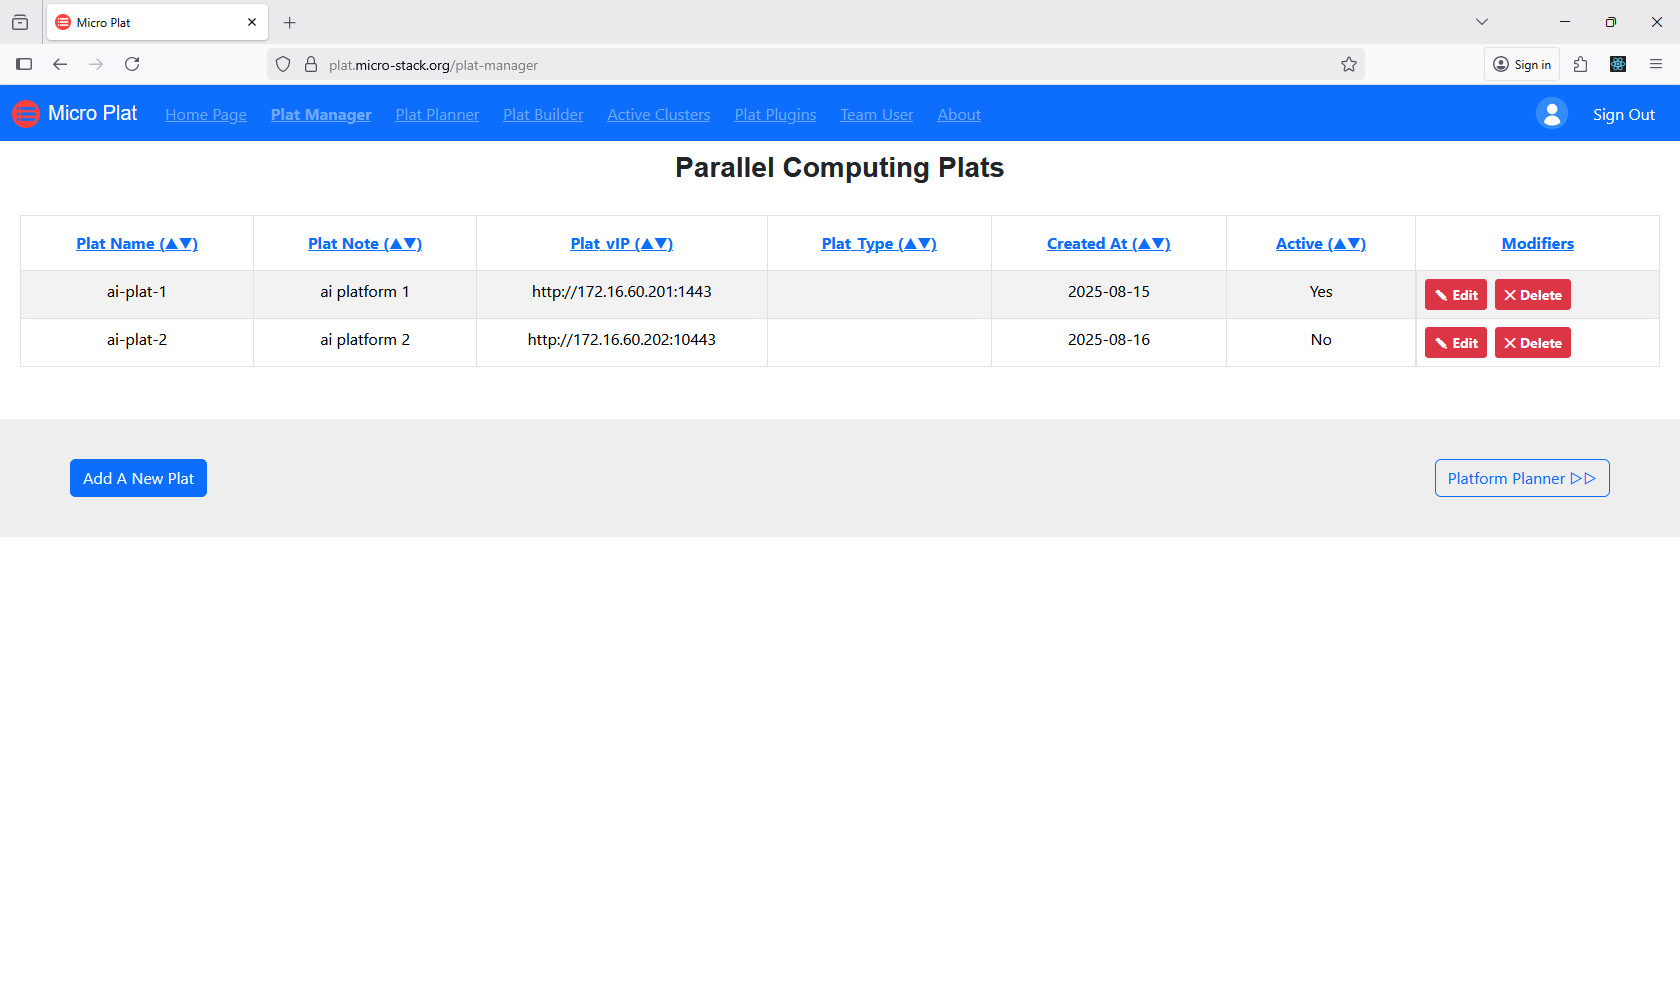
1. Manage Platforms
Use the Plat Manager to create new platforms or select existing ones. This interface allows you to define platform configurations. Ensure your selections match your requirements. The manager provides options for customization. Proceed to planning once selected.
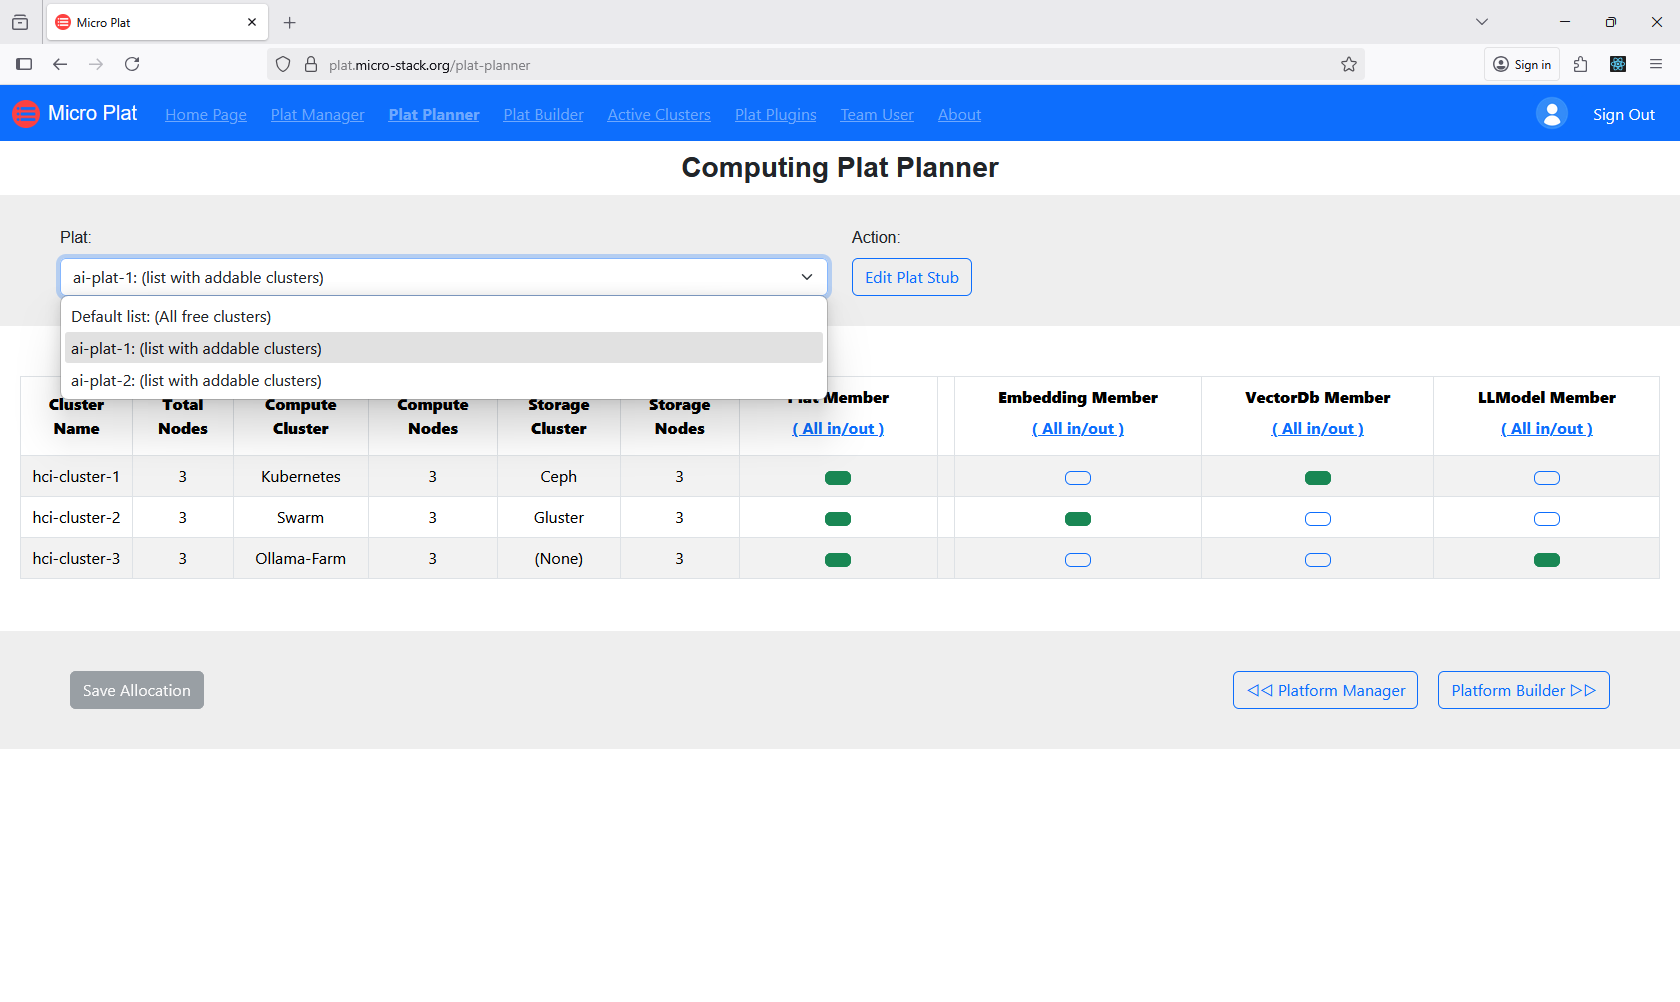
2. Plan Platforms
Plan resources with the Plat Planner to allocate necessary components. This involves specifying compute, storage, and networking needs. Review the planner's suggestions for optimization. Adjust allocations as needed. Proper planning ensures efficient platform deployment.
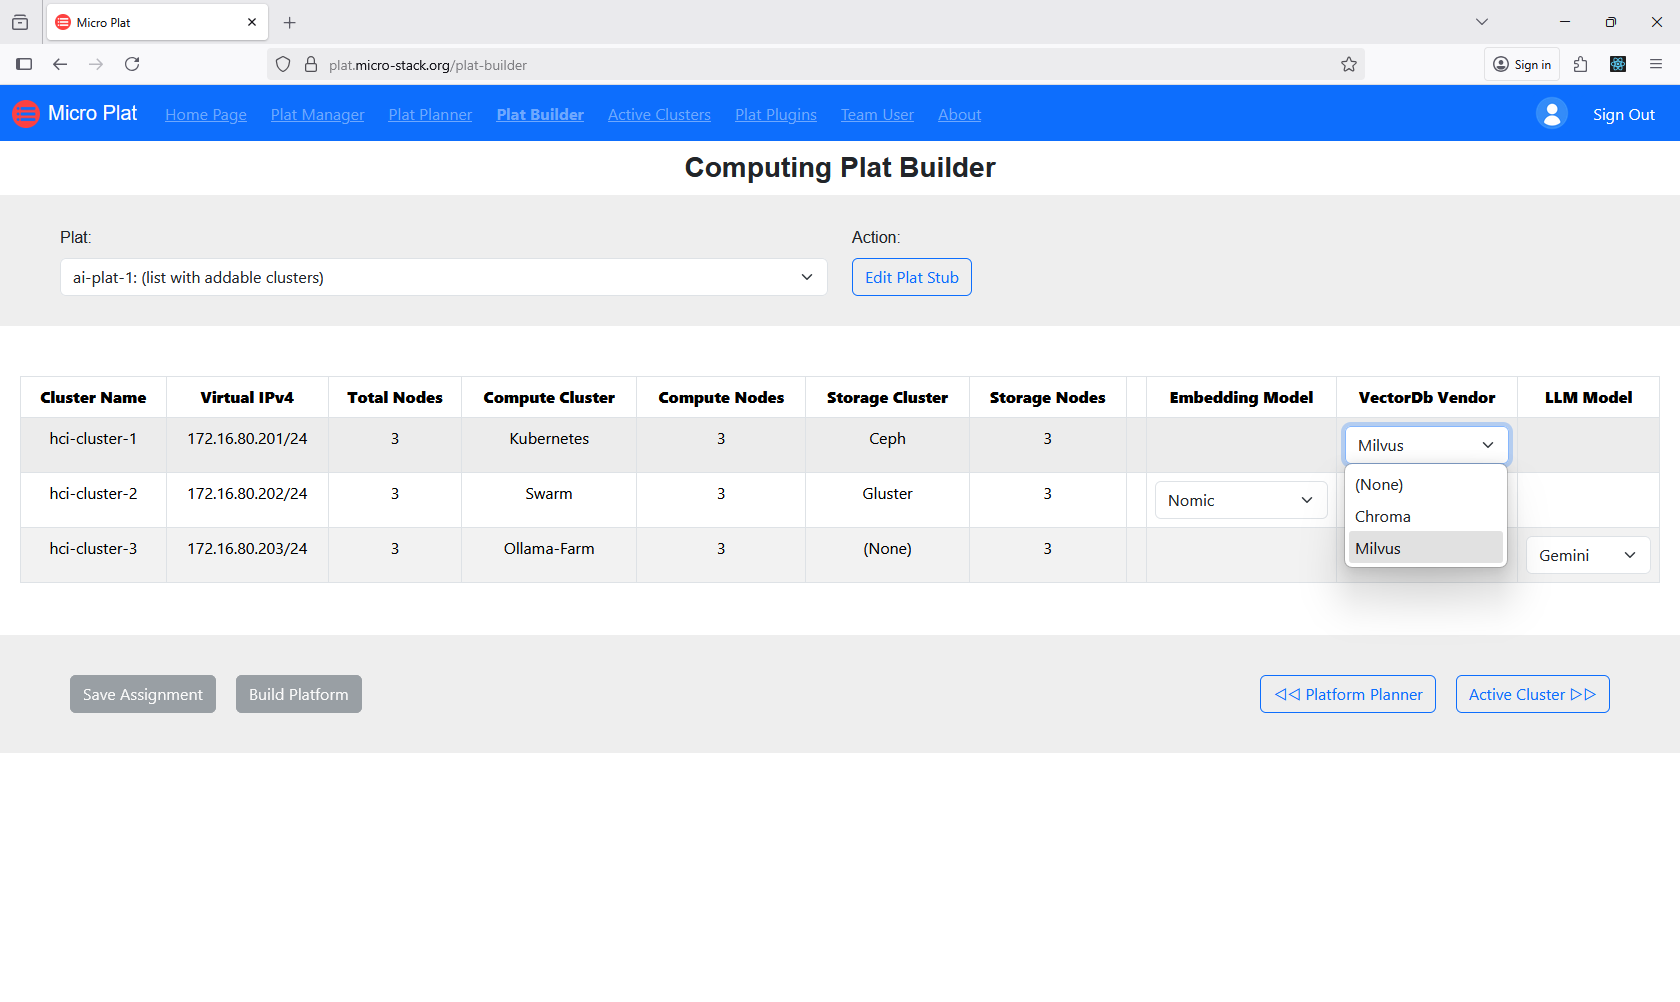
3. Build Platforms
Build platforms via the Plat Builder to assemble the configured resources. This step deploys the platform on the selected clusters. Monitor the build process for completion. The builder automates the setup. Successful builds result in ready-to-use platforms.
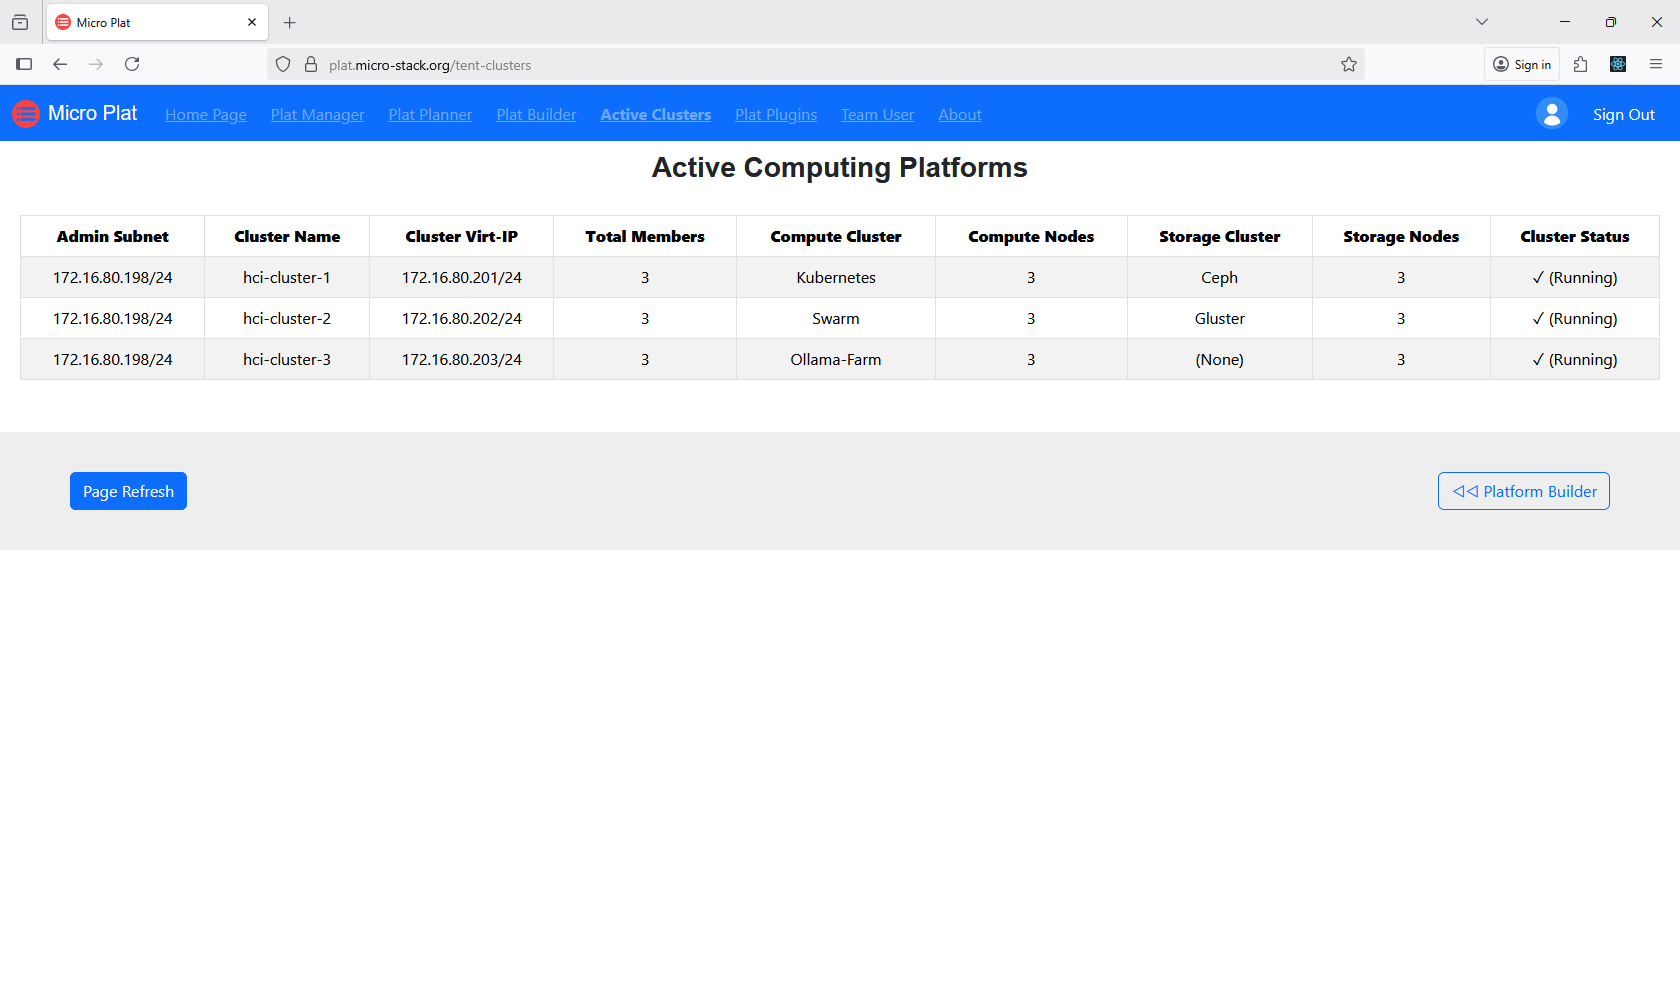
4. Check Platforms
View Active Plats to monitor running platforms and their status. This interface shows performance and health metrics. Check for any issues or updates. Use this to manage active deployments. Regular viewing ensures ongoing reliability.
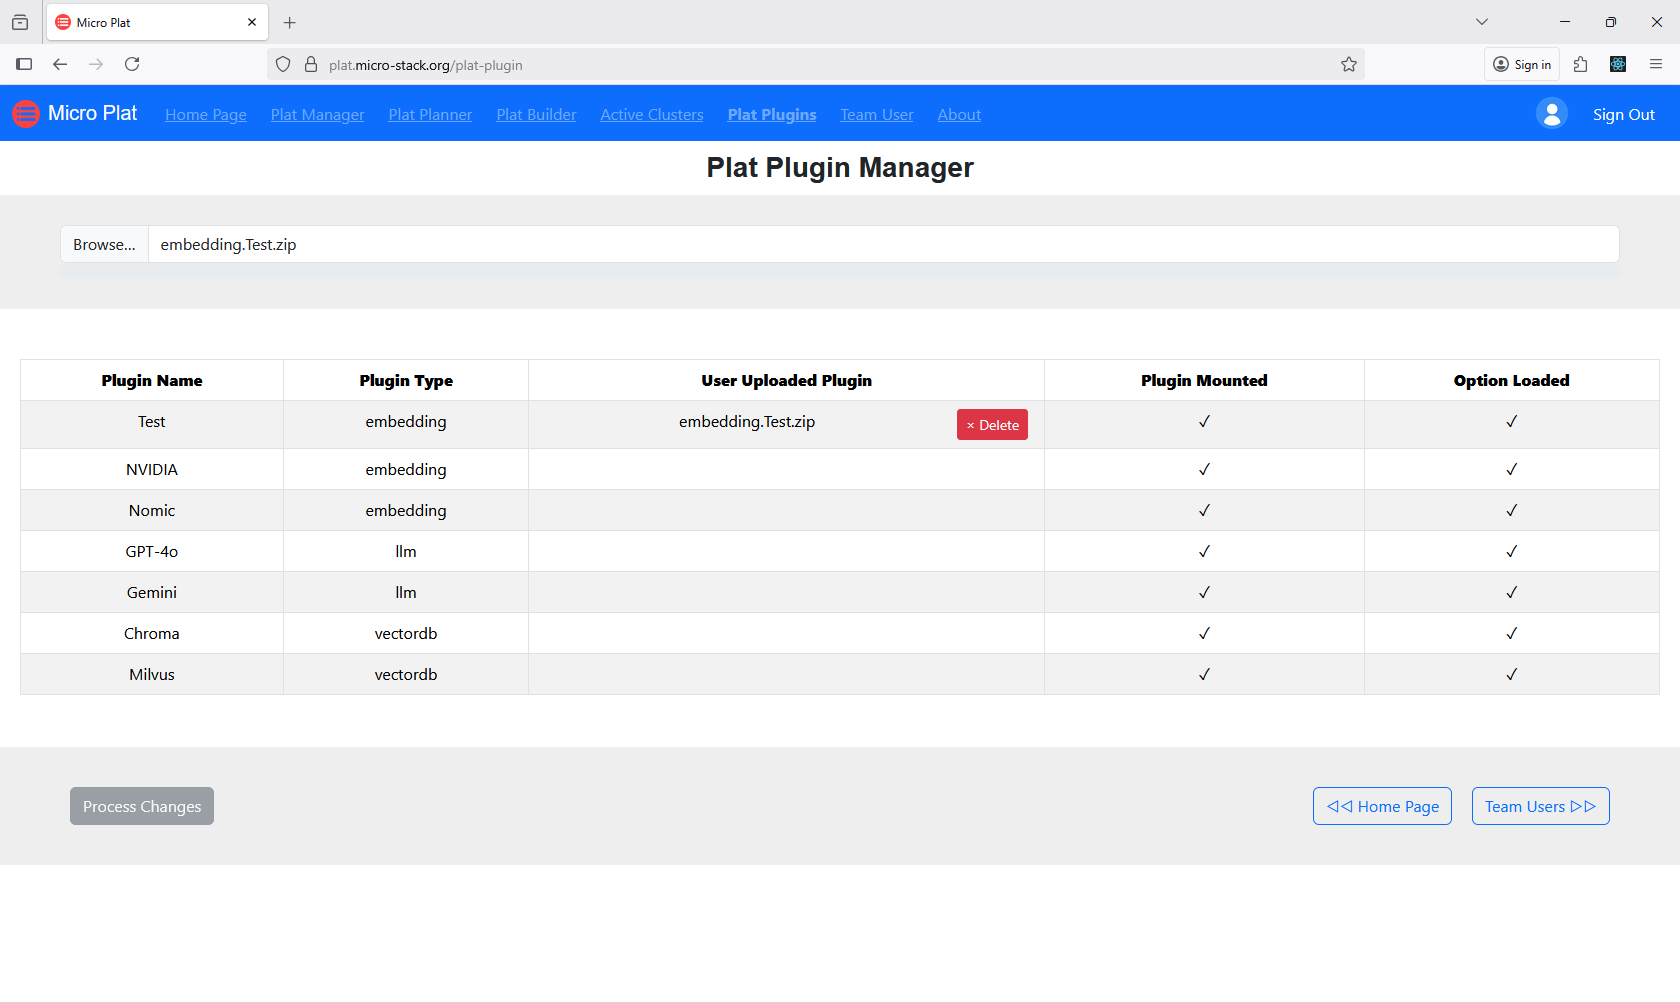
5. Manage Plugins
Manage plugins for AI customizations to enhance platform functionality. Plugins can add AI models or integrations. Install or configure plugins as required. Ensure compatibility with your AI applications. Plugin management optimizes AI performance.
6. Manage Team
(Please refer to the Micro-Rack Manage Team step.)
Micro-Play
Micro-Play is a demo RAG AI chatbot running on Micro-Plat platforms. Explore the live app to see RAG in action. It uses small AI models for quick demos. See the repo.
Workflow: Upload documents → Interact with chat.
Steps:
Tip: This is a demo—use it to understand RAG pipelines before building your own apps on Micro-Plat.
1. Chat with RAG AI
Use the Web Chat interface for interactive AI conversations. Engage with the RAG AI model through natural language. Ask questions and receive responses based on uploaded documents. Explore different topics and queries. This demo showcases AI capabilities.
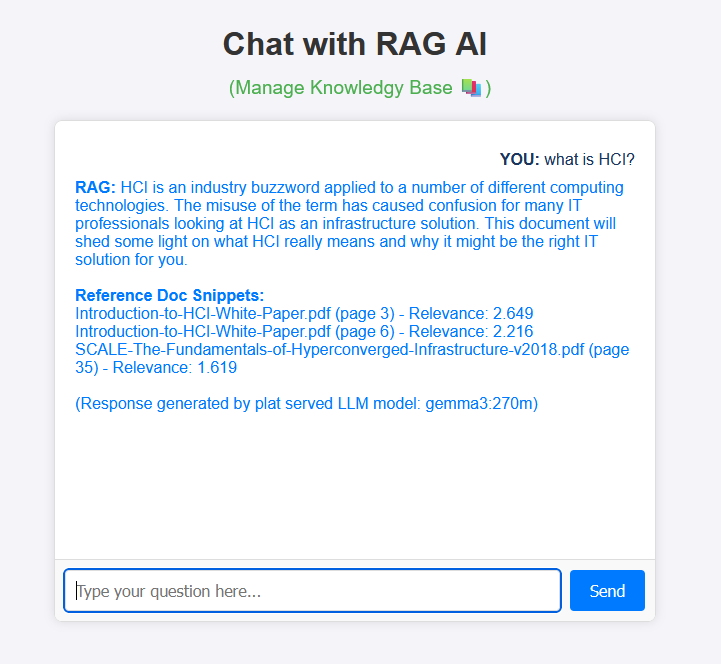
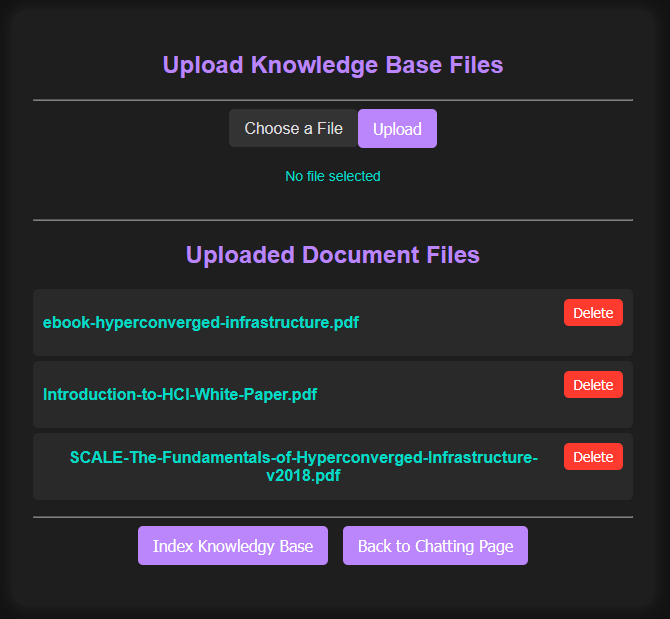
2. Manage Documents
Access the Doc Admin to upload and manage documents for the knowledge base. Add files to enhance AI responses. Organize and update documents as needed. Ensure documents are relevant and accurate. Proper management improves AI performance.